Hi PI script users,
I wanted to share some of my experience with the wonderful new NormalizeScaleGradient (NSG) script developed by John Murphy.
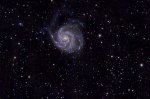
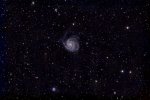
I had 100 x 600 sec raw images of M101 with poor and varying background typical of my urban Hong Kong site. Imaging altitudes were from about 30 to 55 degrees. Taken over several nights. Honestly I had my doubts anything good could come out of it.
The below is not comprehensive, and the very clearly written documentation file (click at bottom of main NSG script dialogue box) is helpful to understand proper useage. Also Adam Block Studios has a series of videos (in the Horizons subscription area) that are very helpful.
I Blinked the images and found the best reference image, which did have a big gradient, but flatter than others. I then selected 7 (worse) images to try and set up the NSG script. It does not take long to run 7 images, but a long time for 100.
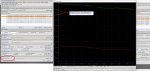
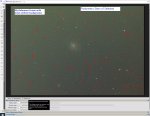
A powerful within the script that John Murphy developed is the Contour Plot. This is where you can see the plotted points, and the calculated correction countour line. See attached RGB contour. At the bottom of the dialoge box (cut off in my attached) are sliders where you can adjust the position of the plot. Areas with no dots probably go through something (like a big star or the core of a galaxy that is rejected).
The default Contour Plot position is through the middle of the plot. If you rerun the script with different smoothness settings you see how closely the contour follows the data. For my data, I lowered the data from default 2.0 to 0.8 shown in order to adequately follow the data points. The better the contour lines follow the data the more uniform (from image to image) the background normalization. Then DBE on the integrated image will be less troublesome. The lower the smoothness setting, the more computations required by the program. For 100 images, it required over 1 hour on my Dell XPS15 laptop.
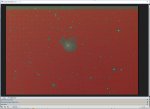
After image integration, DBE, and a host of post calibration steps, I could pull out the data the attached images. My meager setup is a Zenithstar Z103 APO at 560mm using a QHY168C cooled camera. Only an IR filter in use. My skills in post processing are not great, but getting better as I learn from Adam Block Studios videos which tell the story behind the processes, and has complete processing examples.
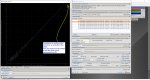
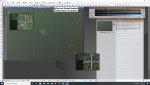
In Sample Generation Plot you see all the reference data points, and the areas kept clear of points. One impressive feature is the ability to zoom in/out with a scrolling mouse and not get lost what you want to scroll in to see. Much better than zooming normal PI views. Try it.
I highly recommend you try the NSG script, even if you do not have varying gradients. It does a good job for providing an accurate weighting factor to be used during ImageIntegration.
Thanks John for this great script! Thanks Adam for your great video series and some insights for using.
Roger