Next Problem - Master Flat not Applied?

ANKulin

Member
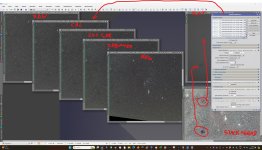
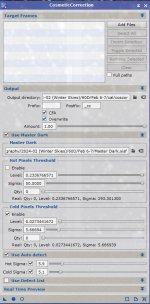
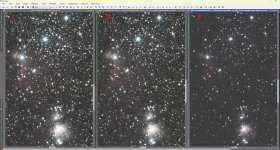
I don't think my master flat was applied and after getting to point where I have removed gradients the error really shows. I have attached a screen shot showing various stages of processing of a single image (Raw-calibrated-cosmetic correction-debayer-registered) as well as master flat and the stacked image with a simple gradient removal applied. Also showing the calibration set-up that was used.

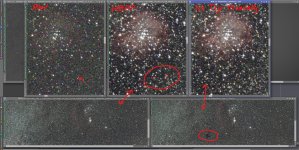
Any ideas how I messed this up? Looking at the images on the left, it is now apparent to me that the calibrated file does not look much different than the raw file, at least in terms of the two obvious sensor dust particles don't appear to have been accounted for in the calibrated version. Which leads to the ugliness seen in the stacked image.
 

Attachments

  • Screenshot 2024-03-23 110931.jpg
    Screenshot 2024-03-23 110931.jpg
    852 KB · Views: 44
WeightedBatchPreprocessing. You find it under Scripts -> Batch Processing and basically is a All-In-One script to deal with Lights, BIAS, Flats and using additional modules to pre-process your images and delivers a master image incl. the corresponding calibration masters.

Cheers
Tom
 
No. I tried doing this manually, step by step
  1. Blink
  2. Subframe Selector
  3. Image Integration to make Master Bias, Dark and Flat files
  4. Image Calibration of Lights
  5. Cosmetic Correction of Lights
  6. Debayering of Lights (photos were OSCs from a DSLR)
  7. Star Alignment of the Lights
  8. Image Integration
  9. Crop
  10. then tried out the new Gradient Correction Tool
But I will try it out. I see that it looks different than what I have seen if it before and what is described on the resource I am using (Inside PixInsight, 2nd Ed. - Warren Keller 2018) . So it is not totally clear to me what to do so I am going to let it run with the default settings. We'll see how it does.
I'd also suggest trying WBPP. Skip Blink and SFS. Create a standard CosmeticCorrection process icon with auto hot set to sigma 3, drop all your images and calibration subs (no masters) into WBPP and add the CC process, and let it run.
 
Create a standard CosmeticCorrection process icon with auto hot set to sigma 3 ...

The OP uses an OSC camera. For cosmetic correction of frames captured with an OSC camera using section 'Use Auto detect', the "default" value of 3.0 for parameter 'Hot sigma' might be a bad choise, depending on the pixel scale. For frames having a large pixel scale, much higher values of 'Hot sigma' are needed in order to avoid removing faint stars in the course of the correction. Besides it is essential to judge the result of cosmetic correction after debayering, and it is advisable to check the number of corrected pixels which is output to the process console and documented in the FITS header of cosmetically corrected frames. The proper number of corrected pixels probably will not vary much for a given camera and gain setting.

See https://pixinsight.com/forum/index.php?threads/cosmetic-correction.23049/ , posts #10 and #11 and additional links given in these posts.

Bernd
Sure, but given the problem under discussion here, I'd still go with sigma 3. Overcorrection of hot pixels will not be visible. It's a minor issue best dealt with when the fundamental processing is under control. Getting properly calibrated images is what matters initially, and that CC setting will ensure that hot pixels don't interfere with registration. Fine tuning can wait.
 
That's OK. Since the recommendation to use a 'Hot sigma' value of 3.0 was given before by other users, I wanted to prevent that this value is perceived as universally applicable. It is not.

Bernd
 
Hi folks. Some real life stuff came up this past week and I was waylaid on something else and have not checked back since Sunday. I see a few posts have followed since my last visit.

So I ran WBPP, and the flats this time seem to have been included in the process and those two dark areas that corresponded to sensor dust particles are now addressed. And by my eye, zooming in on the image, the remaining results look to be about the same between my original and the WBPP version except for one thing. Seems that hot pixels were not removed. So I must have missed a checkbox or something somewhere in the process. I am attaching a screen shot and a log file (the other log file produced with everything shown, exceeds forum file size limits). I skimmed through the attached log file right now and I saw something that said Cosmetic Correction not applied so I am thinking that is where things went awry.

And FYI, my set used to take the photos was as follows:
  • Used Canon 60D with IR filter removed - has a good amount of hot pixels, and all photos come out pinkish (which is easily removed)
    • 4.29 um pixel size (in response to a comment above)
  • Canon 24 mm f/3.5 Tilt Shift Lens (ver. II)
  • Tracking with a LightTrack II on a very noisy frozen lake (lots of really spooky sounds on ice at night, with occasional loud cracks (some noticeably feelable underfoot)
EDIT

I had my Cosmetic Correction process still open, so I took a screen shot. Which I am also now attaching. Looks like in playing around with settings I unchecked hot pixels from darks. Plus what I had on the sliders was probably totally wrong too.
 

Attachments

  • Screenshot 2024-03-27 110332.jpg
    Screenshot 2024-03-27 110332.jpg
    964.5 KB · Views: 21
  • ProcessLogger.txt
    5.6 KB · Views: 15
  • Screenshot 2024-03-27 120300.jpg
    Screenshot 2024-03-27 120300.jpg
    103.9 KB · Views: 19
Last edited:
Hi folks. Some real life stuff came up this past week and I was waylaid on something else and have not checked back since Sunday. I see a few posts have followed since my last visit.

So I ran WBPP, and the flats this time seem to have been included in the process and those two dark areas that corresponded to sensor dust particles are now addressed. And by my eye, zooming in on the image, the remaining results look to be about the same between my original and the WBPP version except for one thing. Seems that hot pixels were not removed. So I must have missed a checkbox or something somewhere in the process. I am attaching a screen shot and a log file (the other log file produced with everything shown, exceeds forum file size limits). I skimmed through the attached log file right now and I saw something that said Cosmetic Correction not applied so I am thinking that is where things went awry.

And FYI, my set used to take the photos was as follows:
  • Used Canon 60D with IR filter removed - has a good amount of hot pixels, and all photos come out pinkish (which is easily removed)
    • 4.29 um pixel size (in response to a comment above)
  • Canon 24 mm f/3.5 Tilt Shift Lens (ver. II)
  • Tracking with a LightTrack II on a very noisy frozen lake (lots of really spooky sounds on ice at night, with occasional loud cracks (some noticeably feelable underfoot)
EDIT

I had my Cosmetic Correction process still open, so I took a screen shot. Which I am also now attaching. Looks like in playing around with settings I unchecked hot pixels from darks. Plus what I had on the sliders was probably totally wrong too.
You can do a lot with CC once you get familiar with it. For the moment I'd just do the simplest, though, as below. If that corrects your hot pixels, you can play around with finer techniques, including using a master dark and bringing up the hot sigma until you start seeing hot pixels again. You probably don't have to do any correction of cold pixels at all.

Screenshot 2024-03-27 103330.png
 
Thank you all. The Cosmetic correction suggestion above removed those hot pixels and my latest result is attached. Noise levels greatly improved but the resulting image (3 for 3rd attempt so far) is darker and hopefully the later tweaking of the image will tease out the reds and orange nebulosity of the region.. For this third attempt, I also included 15 second and 8 second exposures thinking that WBPP could do HDR. Perhaps incorrectly but I came away with that possibility in my watching of the WBPP videos by Adam Block (excellent resource, thanks for pointing that out)
 

Attachments

  • Screenshot 2024-03-31 184056.jpg
    Screenshot 2024-03-31 184056.jpg
    878.8 KB · Views: 16
I also included 15 second and 8 second exposures thinking that WBPP could do HDR
WBPP does not do HDR - but will combine exposures of different length if set up correctly. The separate HDRComposition does HDR, but is often misunderstood. The idea is that you take long exposures of the target (to bring out faint detail); this will cause (usually just a few) brighter parts of the image to be saturated; you then take a set of short enough exposures not to saturate those parts of the image. HDR then scales the dynamic range of the images so that saturated areas can be filled in by the shorter exposure. You rarely need more than two different exposure times. If you supply more than two exposure durations to HDRC it will typicall only use data from the longest exposure, and the longest unsaturated exposure.
 
Okay thanks. So to do HDR with these image sets I suppose I could take my registered 15 and 60 second exposures and run them through HDRC, right.

And for future understanding, in doing deeper sky shots of the Orion Nebula or Andromeda Galaxy, what kind of exposure settings would you recommend for HDR. Assume with my set-up that my long exposures are 60 seconds.
 
So to do HDR with these image sets I suppose I could take my registered 15 and 60 second exposures and run them through HDRC,
The key issue is whether or not any pixels in your image are saturated (i.e. maximum signal value). If there are no saturated pixels in your image you do not need HDRC (your image already has sufficient dynamic range to represent all pixels). If you have saturated pixels in your image, you want to capture a shorter exposure that is as long as possible without saturating any pixels. The exposure required for this will depend on the F-number of your telescope (the focal length divided by the objective diameter), and will also depend on any filters you are using, so it is impossible to specify an appropriate exposure. Sixty seconds is a short exposure for astrophotography; for most targets you will not saturate any pixels with a 60s exposure, so you may not need HDRC at all.
 
I do not have all that sophisticated a setup. DSLR on a LightTrack II tracker, using Backyard EOS. No guidescopes or anything else fancy in my kit. Most of the time, 60 seconds is best I can set it up to do without notable trailing though I do check on tracking 2, 4 and 6 minutes in case my set-up that particular evening was "stellar". And with Orion Nebula and Andromeda for example I can see through viewing RAW files in Lightroom, blown out areas on those two objects.

Very useful to learn that only two sets of exposures can be handled by PiInsight for HDR as I had assumed that I could go ahead and capture using multiple bracket exposures just like I do with my regular landscape photography that I process with HDR software (Lightroom, NIK HDREfex, Photomatix, etc.). I now won't bother going that crazy on future shoots of such objects.
 

Attachments

  • Screenshot 2024-04-01 133908.jpg
    Screenshot 2024-04-01 133908.jpg
    392.6 KB · Views: 15
Very useful to learn that only two sets of exposures can be handled by PiInsight for HDR as I had assumed that I could go ahead and capture using multiple bracket exposures just like I do with my regular landscape photography that I process with HDR software (Lightroom, NIK HDREfex, Photomatix, etc.). I now won't bother going that crazy on future shoots of such objects.

not true, pixinsight can handle many more sets of exposures. there's no limit to what you can load into HDRComposition, but it will eventually stop using shorter exposures once it sees no more saturated pixels. fred was only saying that in practice you might not need more than 2 brackets. but you might, and if you do, and you have the data, you should use it.

i used 8 or more (can't remember exactly) for the 2017 eclipse. PI handled it fine.

rob
 
Back
Top