Author Topic: DSLR Dark Investigation - Puzzling Result  (Read 15601 times)

Offline oldwexi

  • PixInsight Guru
  • ****
  • Posts: 627
    • Astronomy Pages G.W.
Re: DSLR Dark Investigation - Puzzling Result
« Reply #15 on: 2014 April 23 08:02:19 »
Some years ago i did some DSLR testing also. Same models side by side.
What i found out is that Canon was not able to
produce his exactly same camera model twice. If you take 10 cameras of the same model
the all differ somehow, in temperature development, noise, banding, hot pixel, etc...
I assume the single electronic parts cannot be produced 100% the same without
increasing the cost extremely. So if the electronics parts only differ 1% off the target quality
this  multiplies up to bad or good cameras of the same model.
So, therefore it is hard to be convinced that examining one DSLR camera
gets you correct data for these model series. It always depends which kind (better or worse)
example of the model you got.
Doing your test with more cameras of the same model, i expect you will get different puzzling results in your charts.


Gerald

Offline Phil Leigh

  • PixInsight Addict
  • ***
  • Posts: 220
Re: DSLR Dark Investigation - Puzzling Result
« Reply #16 on: 2014 April 23 08:05:57 »
This is certainly true of older Canon DSLR's - the more recent ones are reportedly more... repeatable. Both (re)Manufacturers I spoke to have examined and bench tested many hundreds of cameras in the last few years and their findings back that up.

The old xxD models ( up to and including the 50D) were quite variable.

Offline IanL

  • PixInsight Addict
  • ***
  • Posts: 116
    • The Imaging Toolbox
Re: DSLR Dark Investigation - Puzzling Result
« Reply #17 on: 2014 April 23 15:10:40 »
Ok, thanks for the contributions on that, but I think we've done the EXIF temperature thing to death now.  It was pretty obvious from the get go but I presented the results for your edification and so I guess I shouldn't complain that we have strayed off-topic.  (If you've ever done any CPU or graphics card overclocking it is blindingly obvious that temperature sensors external to the thing you are monitoring are not that accurate. I used to own a dell laptop that had a sensor attached to the CPU with a bit of tape, and once the thermal stress had destroyed the adhesive, the best solution I could find was a small bit of software that forced the cooling fans to run at full speed all the time, otherwise it would just blue screen due to overheating as the sensor was waving around in the air several mm away from the chip package).

Anyway, that's a round-about way of asking if I can get some input to the original question, i.e. why am I seeing a reduction in SNR when stacking my darks, when the theory and the measurements of the individual frames suggest I should see an increase?  It's nothing to do with the vagaries of Canon RAW pre-processing as the data from the images (after pre-processing) indicates I should see an SNR improvement.

astropixel

  • Guest
Re: DSLR Dark Investigation - Puzzling Result
« Reply #18 on: 2014 April 23 16:33:44 »
I think we had to get past that discussion to eventually get back on track. I have 40 dark frames taken at ~0C. Will it be valid to run a similar exercise and note the trend in SNR.

Offline Ignacio

  • PixInsight Old Hand
  • ****
  • Posts: 375
    • PampaSkies
Re: DSLR Dark Investigation - Puzzling Result
« Reply #19 on: 2014 April 23 20:36:40 »
Darks have no signal by construction (no light hitting the sensor), so what you are measuring as signal is the actual "average" dark current and/or fixed pattern "noise" of the camera (including read "noise"). I use quotation marks on "noise", since it is actually a repetitive, systematic signal.

Let's assume that the temp of the sensor is constant for simplicity. Then, if you integrate an "infinite" number of dark frames into a master (very large number in practice), you could calibrate out that "signal" from individual dark frames and be left with pure thermal random noise (albeit a pedestal to avoid truncation). If you integrate those calibrated darks in increasing subsets, you will see the noise decaying as the sqrt(n).

The problem in your exercise is that it is impossible for the software to separate "signal" (fixed pattern noise, including read noise) from random noise, as they both appear random.

Ignacio

Offline bitli

  • PTeam Member
  • PixInsight Guru
  • ****
  • Posts: 513
Re: DSLR Dark Investigation - Puzzling Result
« Reply #20 on: 2014 April 26 13:24:17 »
This post is very interesting because there is some real measurements which are missing of many discussions.

I did not see all these very interesting discussions before posting some results of my own tests at
http://pixinsight.com/forum/index.php?topic=7006.15.

However I think that we try read too much from the measurements of non cooled DSLR. The SNR so calculated in not the real SNR but an estimation based on some assumptions (as explained in the previous reply).  The temperature is some temperature inside the DSLR - it is unlikely that the whole surface of the CMOS and the analog electronic (AD converters) all be at exactly at that temperature within 0.1C (or whatever precision we expect to make details measurements).

The point is that for most of us using standard DSLR it is probably not that useful to make tons of darks (or bias for that matter).  It may be more important to have good flats, reasonable dark, take more light and take advantage of the characteristics of the DSLR rather than trying to handle it as a regulated cooled CCD. Also the behavior of the 350D, later Canon and Nikon are very different and requires different approaches.

-- bitli

Offline pfile

  • PTeam Member
  • PixInsight Jedi Grand Master
  • ********
  • Posts: 4729
Re: DSLR Dark Investigation - Puzzling Result
« Reply #21 on: 2014 April 26 17:24:59 »
i think for canon cameras that exhibit banding, a really good bias frame is necessary (200 subs or so)…

rob

Offline bitli

  • PTeam Member
  • PixInsight Guru
  • ****
  • Posts: 513
Re: DSLR Dark Investigation - Puzzling Result
« Reply #22 on: 2014 April 27 00:33:34 »
(un)fortunately my camera does not have banding. I am glad that you have a solution to your banding problem. However I would be very interested in understanding how the super bias solves the banding problem. By curiosity but also to understand if this is a general solution or if this applies only to specific cases.

My reasoning (and this is speculation, I do not have the data to measure this) is that if there is a repeatable effect due to banding, it should appear in the darks (at least the master darks), otherwise it is unlikely to be noticeable in the lights.  If it is present in the dark, it should be compensated when subtracting the dark (the bias is not used here if you do not optimize the dark).

The bias is usually used to offset the flats. Here it could have an effect. But in this case the banding should be visible on the raw flats (or an integration of them) and it seems to me that the banding should be huge to impact the flat. However some measure would be useful.

How do you use the super-bias ?  Do you have by any chance some measures ?

I try to find the best and most robust rules that apply to most of us, so that beginners have a solid starting point. Clearly there are extreme cases (cooled camera, 100 lights with 5 darks, strong banding, ....) when the simple method may not be the best.

-- bitli


Offline Ignacio

  • PixInsight Old Hand
  • ****
  • Posts: 375
    • PampaSkies
Re: DSLR Dark Investigation - Puzzling Result
« Reply #23 on: 2014 April 27 07:30:38 »
To me, the philosophy is: any calibration frame that shows structure after a standard STF, I like to calibrate out of my lights. Even if their effects may seem negligible at first, in the dim parts of the frame one typically digs down data well into the random noise, where these structures start to show up.

After all, one goes thru a lot of trouble and effort to get the best results possible, from the setup, to acquisition and data processing. So I rather not speculate on adding or not a step to the process, as long as it doesn't make it worse ;^)

In practice, I use a 200-frame master superbias, a 30-frame bias-calibrated master flat (with mid saturation in the three channels), and a 20-to-30-frame uncalibrated master dark (same exposure, similar temp within 2°C as reported by exif), with all my dslr workflows. Never had a problem in terms of dark optimization, being always very consistent with small temp differences.

But that´s me.
Ignacio

Offline IanL

  • PixInsight Addict
  • ***
  • Posts: 116
    • The Imaging Toolbox
Re: DSLR Dark Investigation - Puzzling Result
« Reply #24 on: 2014 April 27 14:11:51 »
Thanks all for the additional input.  Having considered your comments over the weekend I still felt that my test ought to produce something like the expected results, so perhaps my proxies for signal and noise weren't good enough.

Ignacio's definition of what we're measuring here is the one that I have been working to all along; by definition anything that is produces a repeatable pattern (and so can be calibrated out) is a signal, and anything that does not is noise.  In a dark frame there should be no signal from photons, only signals and noise produced by heat in the sensor (dark current and dark current noise) plus signals and noise produced by the chip and camera electronics (fixed pattern - commonly called 'bias' though not techically correct for a typical CMOS sensor and read-out noise; there may be multiple sources of both but we have no way of separating them).

At present I think there is a clear difference in the patterns produced by dark current and by the 'bias'. Comparing a master bias frame and a master dark, visually there is an obvious vertical pattern of 1-2 pixel wide stripes in my master bias, overlaid by a large-scale horizontal banding pattern:


The same two patterns must exist in the uncalibrated (not bias-subtracted) master dark.  A horizontal banding pattern is obvious, but visually the small-scale vertical pattern is not visible using a simple STF. Thus the banding pattern must have a greater ADU range.  What isn't clear is whether the banding pattern is constant; I don't think it is since I often cannot remove it during calibration, and have to use the Canon Banding Script to minimise its appearance in the calibrated light frame.


What isn't apparent just by looking at the master dark is that there is a pattern at a scale of 4-6 pixels which shows when you do a side-by side comparison of single light frames without dark subtraction and with dark subtraction:


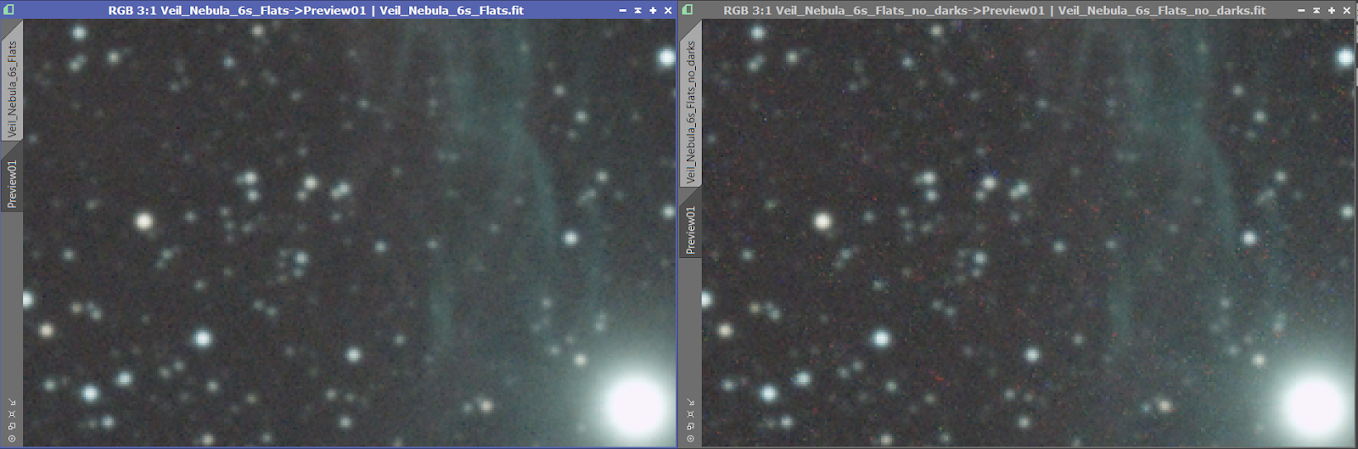
The left image has been dark subtracted, and the right one has not.  Everything else is the same and I have tried to match the STF as closely as possible between the two to give a fair comparison.  In the right-hand image, you can see there is an obvious pattern of red blobs at the 4-6 pixel scale.  There are also similar but less obvious patterns in green and blue when I inspect the individual channels.  Now to some extent it might not matter; these are single calibrated frames and when a stack is integrated the effect may reduce; certainly hot pixels do go if dithering and sufficient frames have been used, but my gut feeling (not fully investigated yet) is that large scale patterns will have some residual effect in the final image unless a very large number of frames and a lot of dithering is used.

Anyway, back to my tests:  I do not concur with the suggestion that the SNR in larger stacks will reduce because we can't separate signal from noise. Even if the intermediate scale pattern in the dark current is too much like noise to be distinguished from real noise, we still have the 'bias' fixed pattern in the image, plus the large scale banding which is not visually apparent in a single frame but appears in a stack of darks.

From my earlier graphs we know that that the mean of the images is fairly constant (it reduces slightly as standard deviation goes up, which we know is due to the Canon pre-processing).  We also know from the graph that for the first 120 frames or so the standard deviation only increases slightly, and thus the rough SNR starts out at about 29.9dB for the best frame, and only drops to 28.4dB by the time we get to frame 120.  As per the purple line on the first graph, integrating these frames should see the SNR increase.

Now if we work on the premise that the dark current pattern is too much like noise to be measured using the standard deviation, the SNR improvement might not be as much as we'd first estimated, but it should still increase due to the 'bias' fixed pattern and the large scale banding.  So I went back to the set of test integrations (I used those with no pixel rejection to avoid any possible confusion arising from rejection effects).

Instead of measuring the means and standard deviations of the whole image, I thought I'd try to avoid any skewing of results due to hot pixels (which appear pretty consistent across all the test integrations as we'd expect).  I created eight previews in small regions with no hot pixels and use the preview aggregator to extract them to one image and then measured the mean and standard deviation of the result.  I repeated this for all of the test integrations plus the highest SNR single dark frame - taking care to duplicate the preview locations exactly for all images.

I then plotted the results below:


The purple line is the theoretical SNR improvement that I calculated from the means and standard deviations of the individual darks (same as the first graph).  The orange line is the SNR from integrating darks of different stack sizes and measuring the whole image (including hot and cold pixels),  The blue line is my new measurement from the aggregated previews of each master dark (i.e. excluding hot pixels).

Now I think I am making a bit of progess.  There is a clear and obvious increase in SNR from 1 to 30 frames (it is also there in the orange line but hardly visible in terms of dB), plus there is the slight tailing off of SNR we expected to see by including the really noisy frames 179-183.  In between the SNR is not really doing much - up and down very slightly, but at least it is not a constant decline.

What I'd really like to do is also exclude the cold pixels and see whether something clearer emerges or not.  Doing that by means of previews is not going to be so easy. For one thing it is not so easy to spot cold pixels (whereas hot ones are obvious), plus I think I might struggle to find reasonably large regions that are free of hot and cold pixels.

One idea that occurred to me was to do a bit of PixelMath and replace all hot and cold pixels (those above or below some threshold values) with the mean value of that dark frame and then measure the whole frame for the stats.  Does that sound reasonable or not?  I guess the other approach would be to create a defect map from the biggest stack and use that to replace the same hots/colds in all images for maximum consistency?  I did try that process once before, but not sure if I can avoid introducing spurious effects on the numbers.

A final wrinkle might be to apply the same processing to all the individual dark frames prior to taking their means and standard deviations.  This would allow a much more accurate 'grading' of the frames by their individual SNRs.  Of course one would use the unmodified darks to create the master, but based on the grading created from the modified ones.
« Last Edit: 2014 April 27 14:20:03 by IanL »

Offline pfile

  • PTeam Member
  • PixInsight Jedi Grand Master
  • ********
  • Posts: 4729
Re: DSLR Dark Investigation - Puzzling Result
« Reply #25 on: 2014 April 27 14:19:22 »
with respect to the banding noise - this noise seems to be random in nature and so integrating a whole load of bias frames together basically gets rid of it. since i calibrate my flats with bias only, using a small stack in the master bias was definitely injecting more banding noise into my final product than was already present in the lights.

there is a thread here from a couple of years ago with an animation showing banding noise going away as the # bias frames is increased. i need to try to find that.

rob

Offline IanL

  • PixInsight Addict
  • ***
  • Posts: 116
    • The Imaging Toolbox
Re: DSLR Dark Investigation - Puzzling Result
« Reply #26 on: 2014 April 27 14:35:18 »
People on other forums have suggested that a stack of 330 bias frames (which I use) is far too many.  You can see from my image in the previous post that even at 330 frames there is an obvious horizontal banding pattern still (it is a bit distorted due to the 1:9 down-scaling in the PI screenshot, but even at 1:1 I can see it by eye).  So for the 500D that I have, the banding pattern actually becomes more obvious with larger stacks of bias frames.  On the other hand it is definitely not totally consistent, I can see changing in individual light frames and I suspect using the bias frame (with its own banding pattern) may actually add more large scale banding rather than removing it.

Something I noticed on a set of M42 images is that the banding was much more obvious to the right of the bright part of nebula that it was to the left, above or below it. I am not sure if it is some kind of effect due to the electronics, the on-camera processing or a combination of both, but seems clear that the appearance of the banding is dependant on the content of the image which suggests to me that trying to calibrate it out is a lost cause (at least for my camera).  Certainly the Canon Banding Script seems to be the only remedy that works, but in the case of the aforesaid M42 it actually made things worse not better.

astropixel

  • Guest
Re: DSLR Dark Investigation - Puzzling Result
« Reply #27 on: 2014 April 27 14:42:33 »
Dithering should help Ian. DSLRs frames benefit considerably from a fairly aggressive dither. I use 15 pixels. Berry and Burnell in their very short chapter recommend at least 12.

Offline IanL

  • PixInsight Addict
  • ***
  • Posts: 116
    • The Imaging Toolbox
Re: DSLR Dark Investigation - Puzzling Result
« Reply #28 on: 2014 April 28 01:31:29 »
Previously, the capture software I was using only allowed for a maximum 5 pixel automatic dither between frames.  Having upgraded to PHD2, it now offers a dithering scaling factor, so I can set that to 3x and get 15 pixel dithering, which I have experimented with this month, but don't have any good data to work with yet due to the weather.

Even so, the larger (and more numerous) the artefacts, the less effective dithering must become simply due to the fact that the probability of bad pixels overlapping in multiple frames and thus contributing to the final average must increase.  Dithering is effective for single hot/cold pixels, and ineffective for large scale effects like the banding in light frames.  I don't know where on the continuum the artefacts I illustrated in the dark/no-dark example above lie, but my basic working principle is to try to achieve the best possible result at every stage of processing.  This is especially important when working within the limitations of an un-modded and un-cooled Canon DSLR (enough problems remain to challenge you without adding more by taking short-cuts in the processing!)

Offline Phil Leigh

  • PixInsight Addict
  • ***
  • Posts: 220
Re: DSLR Dark Investigation - Puzzling Result
« Reply #29 on: 2014 April 28 03:07:50 »
Previously, the capture software I was using only allowed for a maximum 5 pixel automatic dither between frames.  Having upgraded to PHD2, it now offers a dithering scaling factor, so I can set that to 3x and get 15 pixel dithering, which I have experimented with this month, but don't have any good data to work with yet due to the weather.

Even so, the larger (and more numerous) the artefacts, the less effective dithering must become simply due to the fact that the probability of bad pixels overlapping in multiple frames and thus contributing to the final average must increase.  Dithering is effective for single hot/cold pixels, and ineffective for large scale effects like the banding in light frames.  I don't know where on the continuum the artefacts I illustrated in the dark/no-dark example above lie, but my basic working principle is to try to achieve the best possible result at every stage of processing.  This is especially important when working within the limitations of an un-modded and un-cooled Canon DSLR (enough problems remain to challenge you without adding more by taking short-cuts in the processing!)

This is one area where what seems like reasonable theory and practice diverge - I suggest you try the larger dithering scale for yourself. You may be surprised.