Quick Advices to Work with the new SpectrophotometricColorCalibration tool

I thank you very much for your response but could you please elaborate a bit. As I read this I'm really not sure what steps to take. When you say Local Database folder, does that mean the folder where I put the DR3 files? I looked at the Gaia process (for the first time) and found where I could select the DR3 files, which I did and I did select Gaia DR3 in the Data release box.. Is that it or do I need to apply the Gaia process to something? If I do that, would I have to do anything to the settings first? I really don't know what this process is supposed to do and can't find anything about it in my book (Inside Pixinsight). I found a forum post that said it should be applied global and I tried that. It ran and completed but when I tried running SCC again, I got: Error: Database files not available for the Gaia DR3/SP catalog, or the XPSD server is not properly configured. I have no idea how or where to configure an XPSD server. I'm afraid I'm still at a loss here.

AL
 
I'm afraid the GAIA and APASS processes are more recent than "Inside Pixinsight".
It is worth undersanding how they work. They both replace on-line searches using the VizieR interface. Instead they implement efficient local searches of a downloaded version of the key databases with files in the proprietary .xpsd format.
To use these local databases, you must first download the necessary database files, which you can place anywhere you like on your system.
The PCC process requires the APASS data files DR9 and/or DR10 (about 3GB for both files). Because the coverage is not complete in either of these databases, I suggest that you download both if you intend to use PCC. PCC is superseded by the SPCC process. This uses a GAIA database with enhanced spectral data, the DR3/SP files. The full data set comprises 20 files totalling about 63GB; some trial and error may be required to find just how many you need, which will vary from image to image. The ImageSolver script should use the GAIA DR3 files, which are different to the DR3/SP files. These comprise 16 files totalling about 40GB.
Once you have downloaded the files, you must run the APASS process (to locate the APASS DR9 and DR10 files), and the GAIA process (to locate the DR3 and DR3/SP files). The process for specifying the file locations is the same for the APASS and GAIA processes:
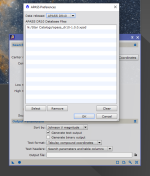
  • first, select the "wrench" icon on the bottom bar of the process.
  • In the pop-up preferences window, select the data release dropdown and select which data release you are going to specify (e.g. "Gaia DR3/SP")
  • now click the "select" control and navigate to the folder with the required files
  • now select all the files required (using the multiple file select funtion of your operating system)
  • select "open" (in Windows, or the equivalent control)
  • the selected files will now be displayed in the database files window of the preferences dialogue
  • Repeat the above process for any other downloaded data release (e.g. "Gaia DR3")
  • you can then close the APASS / GAIA process - you do not need to execute it (globally or otherwise)
Executing the APASS or GAIA processes requests a database search (with the parameters specified in the dialogue). The resulting list of sources can be output to a file, if a file is specified. If no file is specified, a summary is output to the process console. This can be usefull as a quick "reality check" of how many sources there are in a region.
 
Hi, I have SCC working but my problem is with the WBPP icon... saving for future use. The check box I have indicated above does not stay checked, i.e. when you open the icon it is not checked. If I forget to check it, it runs throught the whole sequence, but no image... irritating.
 
OK I had already done all that but I still got the same error when I ran SCC. I only downloaded the SP files, as suggested by the forum post. I was running this on a non-linear image because my linear image would give the "no astrometry data error. When I ran the Image Solver on it I got "*** Error: Invalid or unsupported Gaia database file with unknown identifier 'APASSDR10': N:/Star Catalogs/apass_dr10-1.0.0.xpsd". However it did run and the Process Console showed accurate data for everything. After that, I was able to successfully run SCC on the image. My bad-I knew from before that it was only supposed to run on linear files but tried it as a test case and got caught up in the troubleshooting and never changed it back.

Separate question. Do I need to keep all those gedr3 files? My Star Catalogs folder is almost 50Gb.

thanks,
Al
 

Attachments

  • apass.png
    apass.png
    143.6 KB · Views: 108
  • gaia.png
    gaia.png
    70.2 KB · Views: 118
GAIA EDR 3 are Early Release files, you should replace them with the final ones GAIA DR3 for Image Solver

Cheers
Tom
 
Looking at the documentation, I see there is an option to import filter data in the filter management dialog.

I use an Optolong L Extreme filter with my ASI2600MC pro camera, so I think I need to import the data for that in CSV format in order to get accurate color calibration using SPCC. Where can I find such data for my filter? (I looked on the Optolong website, but couldn't find it).

Here are my current settings in SPCC. Only the L Pro is currently showing, not the L Extreme
View attachment 16543
Any update on this ? How can I get L-Extreme into this? My image of M42 coming out red/Orangish :-(
 
I just ran across this link that I found useful:
. It's a Pixinsight resource discussing SPCC image and platform requirements. I'm still wondering if there are minimum S/N requirements for SPCC and if there are noise reduction algorithms in PI that can affect the performance of SPCC. Is there analysis addressing this?
 
Hi Stuart,

Define accurate! ?

Just using the normal "Average Piral Galaxy", with no additional Filter selected will give an "accurate" result. But perhaps just not as accurate as it could be.

Just for info, using the default SPC and PCC settings, I have seen no pixel level difference between SPC and PCC. Perhaps something that we will change as we come to understand the power of SPC?

Cheers, Jim
This is not correct in my case, I got Orange color for my M42. Don't know how to get the curve data for L-Extreme. If anyone can point me to right direction would be great.
 
This is not correct in my case, I got Orange color for my M42. Don't know how to get the curve data for L-Extreme. If anyone can point me to right direction would be great.
I made the curve for the Optolong L-eXtreme in an Excel sheet by assuming that the peaks have a Gaussian distribution, transmission at H-alpha is 0.89, transmission at [OIIÌ] is 0.88, the FWHM is 7 nm and that the standard deviation is FWHM divided by 2.355

Then I created the attached file. I still haven't used it and don't now if its useful at all. At least the transmission vs. wavelength looks OK to me.
 

Attachments

  • L-eXtreme.zip
    696 bytes · Views: 93
I made the curve for the Optolong L-eXtreme in an Excel sheet by assuming that the peaks have a Gaussian distribution, transmission at H-alpha is 0.89, transmission at [OIIÌ] is 0.88, the FWHM is 7 nm and that the standard deviation is FWHM divided by 2.355

Then I created the attached file. I still haven't used it and don't now if its useful at all. At least the transmission vs. wavelength looks OK to me.
Thanks. I have imported it. Any idea how to check if the filter definition is used during SPCC or not? I don't see much difference. I also noticed my fits header did not have any filters mentioned. I added that to the image and ran it as well. I tried various options and this image is with narrow band checkbox selected and I had values for the filters(see attached screenshot). My camera is ASI533 and I have Optolong L-Extereme filter on it. Scope WO GT 81IV. I see many pictures in Astro bin in purple colorist. But mine coming up Orange/reddish. Not sure if that is due to filter or something I am doing wrong in stacking or processing. Appreciate any input to it.

1670643136392.png
 

Attachments

  • M42_2022_9_dec.jpg
    M42_2022_9_dec.jpg
    656.5 KB · Views: 78
Last edited:
Thanks. I have imported it. Any idea how to check if the filter definition is used during SPCC or not? I don't see much difference. I also noticed my fits header did not have any filters mentioned. I added that to the image and ran it as well. I tried various options and this image is with narrow band checkbox selected and I had values for the filters(see attached screenshot). My camera is ASI533 and I have Optolong L-Extereme filter on it. Scope WO GT 81IV. I see many pictures in Astro bin in purple colorist. But mine coming up Orange/reddish. Not sure if that is due to filter or something I am doing wrong in stacking or processing. Appreciate any input to it.
I'm not completely sure I understand how to use it, so consider that what I'm writing bellow could be wrong.

I think that you have to select a sensor i.e.: Sony Color Sensor R-UVIRcut in the curve explorer and then Ctrl-Click on the Optolong filter. Then you have to combine them into a new filter (2nd icon on the bottom left) to get the response of both. Then repeat for the green and blue components.

However, I think this would give you the same results as using the narrowband filters mode as you show on your screenshot.

I think combining filter response with sensor curves is useful when the filter response is complex, like in the case of the L-Pro.

For narrowband filters I would try the narrowband mode.
Yea. I tried all combinations. The result is more or less same. Thanks
 
Another question: how do I choose sensor and filters for DSLR if my camera is not listed on the menu? I have some data dates back to Canon 20Da, and currently I am using Pentax 645z. Any suggestions?
 
The ZWO ASI2600MC Pro comes with an IR cut (only, not UV) installed in the camera which uses a Sony IMX571 sensor. This is essentially the "default" option for one of the most popular cameras on the market.

Why is there only an "UV/IR Cut" option for this and not an "IR Cut only" for Sony Color Sensors?

I am especially curious given the recent addition of other options for multi-band narrow band filters, but not this stock iteration.

I have been using the "UV/IR Cut" option with seemingly good results, but I am concerned that this is not the best possible option.
 
I see the latest update of Pixinsight has commonly used filters available as options :) Thanks. Hopefully we will have L-Pro etc available as well soon.
 
Last edited:
The ZWO ASI2600MC Pro comes with an IR cut (only, not UV) installed in the camera which uses a Sony IMX571 sensor. This is essentially the "default" option for one of the most popular cameras on the market.

Why is there only an "UV/IR Cut" option for this and not an "IR Cut only" for Sony Color Sensors?

I am especially curious given the recent addition of other options for multi-band narrow band filters, but not this stock iteration.

I have been using the "UV/IR Cut" option with seemingly good results, but I am concerned that this is not the best possible option.
From the ZWO ASI2600MC Pro Owner's Manual:

"5.6 Protective Window There is a protective window in front of the 2600 camera sensor, with 60mm diameter and 2mm thickness. ASI2600MM Pro uses an AR coated filter, while ASI2600MC Pro uses IR CUT filter. "
 
From the ZWO ASI2600MC Pro Owner's Manual:

"5.6 Protective Window There is a protective window in front of the 2600 camera sensor, with 60mm diameter and 2mm thickness. ASI2600MM Pro uses an AR coated filter, while ASI2600MC Pro uses IR CUT filter. "
Per the ZWO ASI2600MC Pro camera specs on the ZWO website, the protective window is a D60-2 IR Cut. I contacted ZWO Tech support and asked for the bandpass chart for this filter, and they sent me this.
IR-Window-graph1.jpg

Based on the curve, the filter may be better described as UV IR Cut
  • Visible: 400nm - 700nm
  • UV: < 400nm
  • IR: > 700nm
 
Although the Optolong L-Pro is on the "Curve Explorer" (CE) list, it is not obvious (from the documentation) how to use it. Is this the correct process:
  • in CE, find and select the best match to your camera R filter
  • in CE, find and Ctrl-click the Optolong L-Pro ("PAN") filter
  • click on the View attachment 16545 icon to combine and create and name a new combined R filter
  • repeat for G and B filters
  • select the combined filters from the R, G, B dropdowns
why doesnt pixinsight staff answer this question? its a bit annoying for folk trying to learn pixinsight that there is no guide to using these features. come on staff!¬!!!
 
Back
Top