Strange Problems with Image Calibration

markuspaul

Active member
Hello.
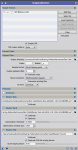
I have strange problem with image callibration. I took images of two objects (Trifid/Lagoon & Veil) during one night with exactly the same settings. Callibration works well with the images of the first object (Trifid & Lagoon) in removing the vignetting of the lense. For the second objects (Veil Nebula) it somehow overcompensates the vignetting so the corners of the images appear brighter then the centre. And yet both are calibrated with the same master flat and there has been no changes in equipment, exposure etc. between the images taken of the two objects. Any idea of what could potentially be going on?

Attached is a screenshot of the calibration routine settings and below is a link with the files from both objects. I have just selected a single frame from each object since it is sufficient to show the issue.


Markus
 

Attachments

  • Screen Shot 2021-07-14 at 16.17.54.png
    Screen Shot 2021-07-14 at 16.17.54.png
    386.3 KB · Views: 52
Markus,

without having looked in detail into your problem, it appears that you calibrate already debayered images (looking at the included screenshot and assuming you stick with PI naming conventions).

You want to calibrate before debayering the images.

/Ralf
 
Thank you Ralf for the feedback. I assume there is no link with the issue at hand since it would impact both sets of Lights equally if this were the cause of the issue. In any case, I would be grateful for advice on when to apply Debayer for One Shot color images since I have not found clear instructions on this. Here is the order that I follow:

1) Debayer Bias, then Integrate to create Master Bias
2) Debyer Darks, then Integrate to create Master Dark
3) Debayer Flats, then Calibrate with Master Bias and Master Dark, then Integrate to create Master Flat
4) Debayer Lights, then Calibrate with Maser Bias, Dark and Light, then Subframe Selector, then Star Alignment, then Integration

Any advice on how to correct this sequence is more then welcome. Markus
 
Hi Markus,

ImageIntegration and (optionally) CosmeticCorrection shall be applied on CFA data. So the correct order is:

1) Integrate bias frames to MasterBias,
2) Integrate dark frames to MasterDark,
3) Calibrate flat frames with MasterBias (no MasterDark, no dark frame optimization),
4) Integrate calibrated flat frames to MasterFlat,
5) Calibrate light frames with MasterDark (no dark frame optimization) and MasterFlat,
6) Debayer calibrated light frames,
7) Align calibrated and debayered light frames,
8) Integrate calibrated, debayered and aligned light frames.

The recommendation not to use dark frame optimization in ImageCalibration of the light frames is appropriate for sensors that exhibit "amplifier glow".

More details for correct image calibration in my guide, https://pixinsight.com/forum/index.php?threads/for-beginners-guide-to-pis-imagecalibration.11547/ .

Bernd
 
Markus,

The typical workflow would be as follows:

1) Integrate bias frames to create Master Bias
2) Integrate dark frames to create Master Dark

1) and 2) are done periodically every couple of months or so, as they are specific to the camera sensor and remain relatively stable over time.

However the following should be done for each imaging session:

3) integrate flat frames to create Master Flat
4) Calibrate Lights
5) Cosmetic correction
6) Debayer
7) Subframe Selector to determine bests subs
8) Star Alignment
9) Image Integration

You may want to read Bernd”s excellent guide for a more detailed description of the individual steps:


Hope this helps.

/Ralf
 
Oops just noticed that Bernd had already replied while I was still typing my reply :) at least we seem to be aligned in our response.

/Ralf
 
Last edited:
Thanks to both of you. I will try this in the coming days. One add-on question for you Bernd. I use an ASI6200 where the manufacturer clames "zero amp glow" (I am not sure if this is correct). Would you recommend no to use dark frame optimization in any case?
 
Back
Top