
You are using an out of date browser. It may not display this or other websites correctly.
You should upgrade or use an alternative browser.
You should upgrade or use an alternative browser.
PhotometricMosiac 4.0
- Thread starter jmurphy
- Start date
jmurphy
Well-known member
PhotometricMosaic v3.3.1
TrimMosaicTile v1.4
SplitMosaicTile v1.3
Minor update to rename 'OK' button to 'Run' and 'Cancel' button to 'Exit'.
This makes these scripts consistent with WBPP and NormalizeScaleGradient.
[PixInsight 1.8.8-9 now includes these updates]
TrimMosaicTile v1.4
SplitMosaicTile v1.3
Minor update to rename 'OK' button to 'Run' and 'Cancel' button to 'Exit'.
This makes these scripts consistent with WBPP and NormalizeScaleGradient.
[PixInsight 1.8.8-9 now includes these updates]
Last edited:
By the way, what is the recommended method for mosaics of 2 X 3
Do you use Photometric Mosaic on 1 X3 (twice), then Mosaics by coordinates (+Trim) and then Photometric Mosaic to bring the two halves together ?
If not, you will have a tiles that need to blend on two sides at the same time.
Thanks
Do you use Photometric Mosaic on 1 X3 (twice), then Mosaics by coordinates (+Trim) and then Photometric Mosaic to bring the two halves together ?
If not, you will have a tiles that need to blend on two sides at the same time.
Thanks
jmurphy
Well-known member
Provided you have a planned mosaic, were the tiles make up a regular grid, you should add all of them to MosaicByCoordinates in one go. Then trim all the registered files. Tip - the registered files will be very large, so use the .xisf lossless compression when saving them. The black areas compress really well!By the way, what is the recommended method for mosaics of 2 X 3
Do you use Photometric Mosaic on 1 X3 (twice), then Mosaics by coordinates (+Trim) and then Photometric Mosaic to bring the two halves together ?
If not, you will have a tiles that need to blend on two sides at the same time.
Thanks
Then (text from the help file):
If you are creating a mosaic of more than two tiles, first join the frames into either rows or columns, then join these strips to create the final mosaic. Try to start with the tile that has the least gradient. The script is designed for planned mosaics that form a regular grid.
For best results, the sides of the reference frame should be close to horizontal / vertical. When using MosaicByCoordinate, make sure that the first frame you add to it is a frame that is at approximately the same angle as most of the other frames. This defaults the angle of the registered mosaic.
For ultra wide field mosaics (for example 50 mm camera lens), the angles of the frames will vary due to the spherical geometry. In these cases it can be better to use MosaicByCoordinates with a smaller number of files - perhaps one column, or even two tiles at a time. This will help keep the reference frame sides approximately horizontal / vertical. SplitMosaicTile can also help.
Note that it is only the reference frame angle that matters. The target frame angle will not usually cause any problems.
Last edited:
Hi John,
Thank you very much for your script. I have used it with great success with a 4 tiles mosaic in the cygnus constellation:
https://storage.googleapis.com/dso-...3b7f36a7b259feba7fbb997d715ecb48-original.jpg
It took some times to apprehend the functioning of the script but the documentation you provided helped a lot!
Just a very small suggestion (although I'm not sure its in your hands): I think it would be more convenient and more logical to have the MosaicByCoordinates script in the "Mosaic" menu entry instead of the "Utilities" entry.
Regards
Nicolas
Last edited:
jmurphy
Well-known member
@Andres.Pozo Any thoughts on this? The Utilities menu is getting quite crowded, so would it be worth moving the excellent MosaicByCoordinates script to the 'Mosaic' sub menu instead?Hi John,
Thank you very much for your script. I have used it with great success with a 4 tiles mosaic in the cygnus constellation
Just a very small suggestion (although I'm not sure its in your hands): I think it would be more convenient and more logical to have the MosaicByCoordinates script in the "Mosaic" menu entry instead of the "Utilities" entry.
Regards
Nicolas
jmurphy
Well-known member
Superb result!Thank you very much for your script. I have used it with great success with a 4 tiles mosaic in the cygnus constellation:
https://storage.googleapis.com/dso-...3b7f36a7b259feba7fbb997d715ecb48-original.jpg
It took some times to apprehend the functioning of the script but the documentation you provided helped a lot!
Regards Nicolas
")
Andres.Pozo
Well-known member
I have no objections. Both MosaicByCoordinates and MosaicPlanner should be in the Mosaic sub-menu.@Andres.Pozo Any thoughts on this? The Utilities menu is getting quite crowded, so would it be worth moving the excellent MosaicByCoordinates script to the 'Mosaic' sub menu instead?
jmurphy
Well-known member
Just a very small suggestion: I think it would be more convenient and more logical to have the MosaicByCoordinates script in the "Mosaic" menu entry instead of the "Utilities" entry.
@Juan Conejero Do you have any objections to this change? If you are happy for this to go ahead, I would be happy to make the trivial change and upload it to GitLab.I have no objections. Both MosaicByCoordinates and MosaicPlanner should be in the Mosaic sub-menu.
Should this change be pushed via the automatic update system, or should it wait for the next PixInsight release?
Thanks, John Murphy
Last edited:
John, I'm about to run MosaicByCoordinates on all my 40 panels. You say above to use .xisf lossless compression when saving them, but I can't see an option to do this in the script. How were you intending that this would be achieved?...Provided you have a planned mosaic, were the tiles make up a regular grid, you should add all of them to MosaicByCoordinates in one go. Then trim all the registered files. Tip - the registered files will be very large, so use the .xisf lossless compression when saving them. The black areas compress really well!
Thanks
Peter.
jmurphy
Well-known member
I don't think MosaicByCoordinates can do this. However, when you use TrimMosaicTile and PhotometricMosaic on the 40 panels, you can then save the files with compression.John, I'm about to run MosaicByCoordinates on all my 40 panels. You say above to use .xisf lossless compression when saving them, but I can't see an option to do this in the script. How were you intending that this would be achieved?
Hi John
I finished putting my mosaics together for each of my filters, and after applying DBE I tried putting the RGB channels together for the first time. The result is disappointing - there are colour gradients everywhere.
I couldn't see these gradients in the individual filter masters, but when I did a boosted STF they did start to show up.
Do you know if there's a way to clean this up going forward, or do I need to go back to NSG and start again?
Here's the file if you want to have a look: https://drive.google.com/file/d/1VvvEbSSdXn9ygnbBtYIaMtjWm3UWOjN5/view?usp=sharing
Peter.
jmurphy
Well-known member
Color mosaics of M31 are really tricky...Hi John
I finished putting my mosaics together for each of my filters, and after applying DBE I tried putting the RGB channels together for the first time. The result is disappointing - there are colour gradients everywhere.
I couldn't see these gradients in the individual filter masters, but when I did a boosted STF they did start to show up.
Do you know if there's a way to clean this up going forward, or do I need to go back to NSG and start again?
Here's the file if you want to have a look: https://drive.google.com/file/d/1VvvEbSSdXn9ygnbBtYIaMtjWm3UWOjN5/view?usp=sharing
Peter.
The best option is to take (or borrow) a wide field image of the galaxy. This image must still be linear. Then:
- Register the wide field image to your completed mosaic.
- Split the wide field image into its R, G, B color components.
- For each of your registered stacks, use the appropriate color component of the wide field image as the reference and your stacked image as the target. Use the 'Mosaic Join' combination mode 'Target'. Instead of creating a mosaic, this will produce a copy of the target image, corrected for scale and gradient.
- Finally, mosaic all the gradient corrected stacks as before.
The wide field image does not need to be of high quality. It should still work even if it is noisy or of poor resolution. We are only using it to remove gradients. Ideally it should not have complex gradients though! If you use DBE to correct the gradients in the wide field image, do this before you register it to your mosiac to ensure that the black areas around the registered wide field image remain at zero.
Hope this helps, John Murphy
Hi,
First of all, thank you for creating the script. It works very well for me. Now I encounter a problem and I don't quite know how to solve it after reading the help file.
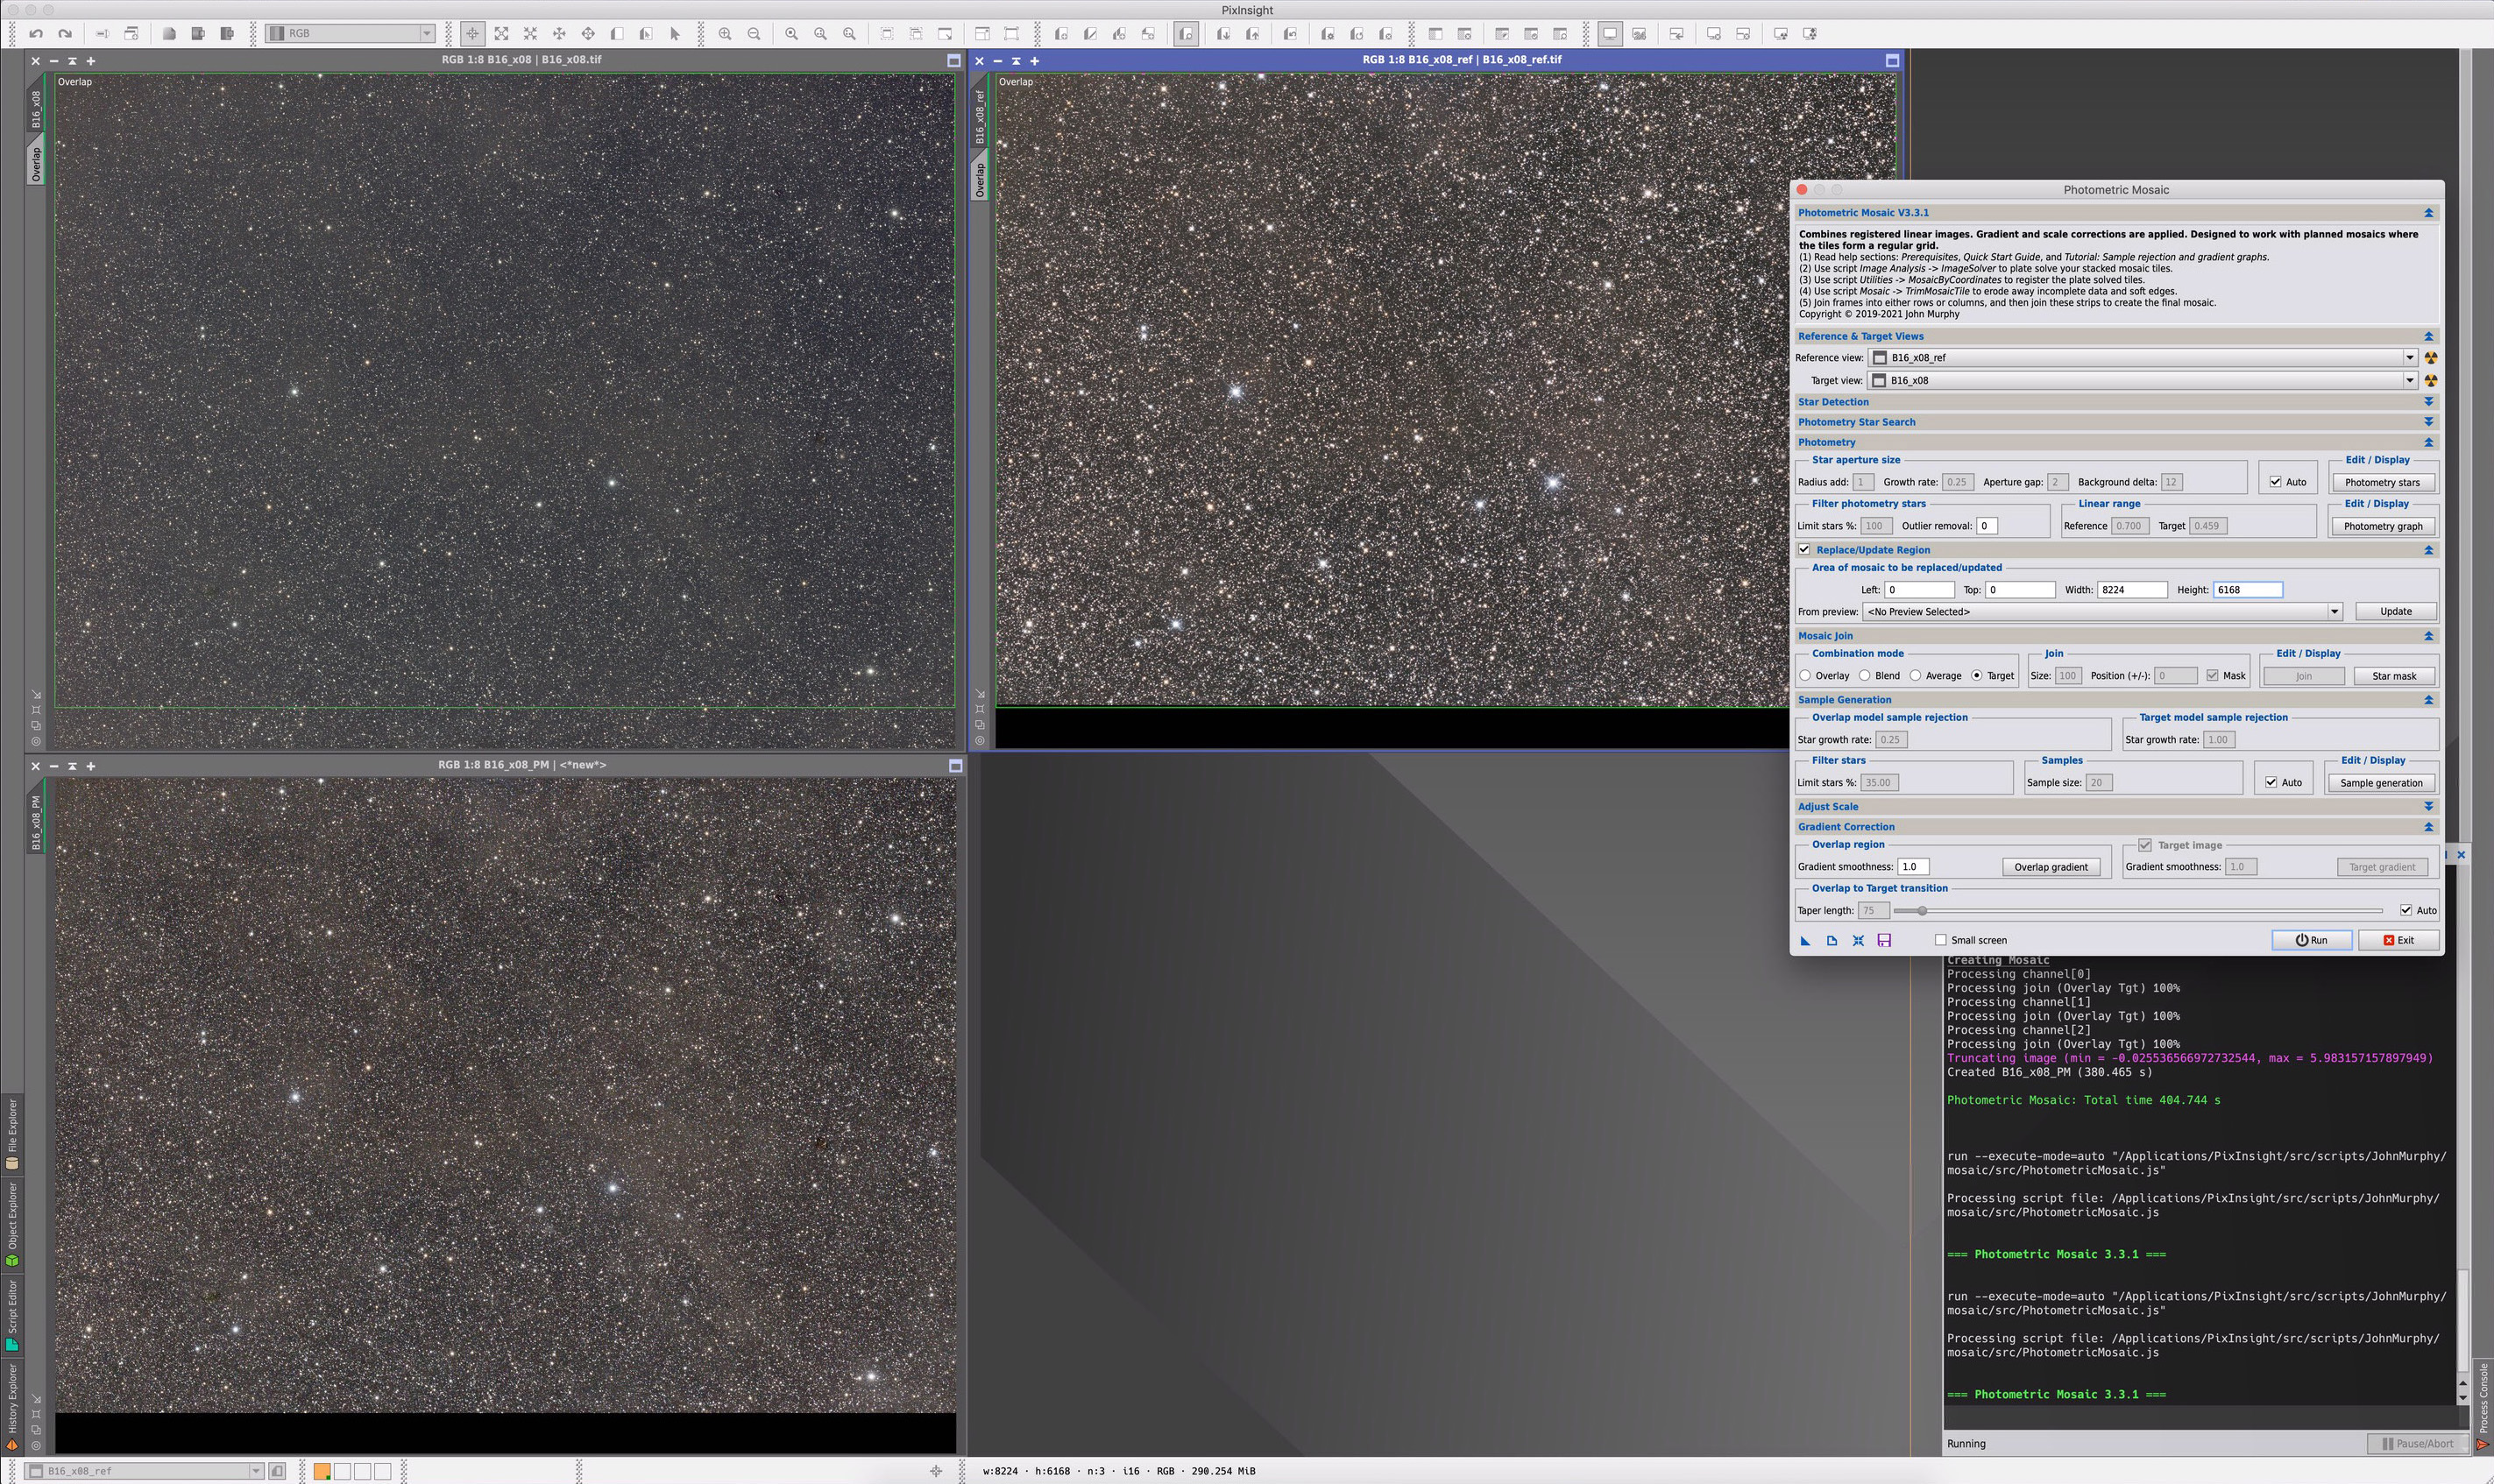
Let me use the screen shot to explain. My goal is to use a wide-field reference image to correct for the gradient in individual mosaic panels. Overall it worked. However, along the edge of the mosaic where the wide-field reference does not fully cover a mosaic panel, I have problems.
In the screen shot, the upper-left window (target) is the mosaic panel to be removed for gradient. The upper-right window is the wide-field reference, registered to the target. So the target and the registered reference have identical dimensions and identical star positions. And as you can see, the reference does not completely cover the target and there is a small black stripe along the bottom edge.
The photometric mosaic script window shows my setting. This setting works well when the reference fully covers the target. Now when there is a gap in the reference, my naive imagination is that the gradient model will just be extrapolated to that uncovered area. Unfortunately, no matter the gradient model is extrapolated or not, I just can't get a final image that contains all the pixels from the target. The lower-left window is the result. It comes from the target, with brightness/color/gradient well matched to the reference, except that pixels in the bottom stripe are gone. I experimented a bit to try various settings, and still can't get a result image with black area along the bottom edge.
What did I miss?
Cheers,
Wei-Hao
First of all, thank you for creating the script. It works very well for me. Now I encounter a problem and I don't quite know how to solve it after reading the help file.
Let me use the screen shot to explain. My goal is to use a wide-field reference image to correct for the gradient in individual mosaic panels. Overall it worked. However, along the edge of the mosaic where the wide-field reference does not fully cover a mosaic panel, I have problems.
In the screen shot, the upper-left window (target) is the mosaic panel to be removed for gradient. The upper-right window is the wide-field reference, registered to the target. So the target and the registered reference have identical dimensions and identical star positions. And as you can see, the reference does not completely cover the target and there is a small black stripe along the bottom edge.
The photometric mosaic script window shows my setting. This setting works well when the reference fully covers the target. Now when there is a gap in the reference, my naive imagination is that the gradient model will just be extrapolated to that uncovered area. Unfortunately, no matter the gradient model is extrapolated or not, I just can't get a final image that contains all the pixels from the target. The lower-left window is the result. It comes from the target, with brightness/color/gradient well matched to the reference, except that pixels in the bottom stripe are gone. I experimented a bit to try various settings, and still can't get a result image with black area along the bottom edge.
What did I miss?
Cheers,
Wei-Hao
jmurphy
Well-known member
You were so close to solving this tricky problem! You need to deselect the 'Replace/Update Region' check box. This section is only used when you are replacing a section of a mosaic. It does not make sense to use this option with the 'Target' mode. I should probably add a warning for this combination.First of all, thank you for creating the script. It works very well for me. Now I encounter a problem and I don't quite know how to solve it after reading the help file.
Let me use the screen shot to explain. My goal is to use a wide-field reference image to correct for the gradient in individual mosaic panels. Overall it worked. However, along the edge of the mosaic where the wide-field reference does not fully cover a mosaic panel, I have problems.
In the screen shot, the upper-left window (target) is the mosaic panel to be removed for gradient. The upper-right window is the wide-field reference, registered to the target. So the target and the registered reference have identical dimensions and identical star positions. And as you can see, the reference does not completely cover the target and there is a small black stripe along the bottom edge.
The photometric mosaic script window shows my setting. This setting works well when the reference fully covers the target. Now when there is a gap in the reference, my naive imagination is that the gradient model will just be extrapolated to that uncovered area. Unfortunately, no matter the gradient model is extrapolated or not, I just can't get a final image that contains all the pixels from the target. The lower-left window is the result. It comes from the target, with brightness/color/gradient well matched to the reference, except that pixels in the bottom stripe are gone. I experimented a bit to try various settings, and still can't get a result image with black area along the bottom edge.
The help section for 'Replace/Update Region' states:
"Only the target image pixels that are both within the specified region and within the target - reference overlap are used."
With this option deselected, the 'Target' mode will then use the whole of the target image.
Let me know if this helps, John Murphy
Last edited:
Hi John,
If I deselect the Replace/Update Region box, an error message (the attached image) shows up and it does not allow me to proceed further. The message box asks me to swap the reference and the target, but this is the opposite of what I want. After experimenting a bit, I found the only way to bypass this error message and to proceed was to check the Replace/Update Region box. And the result is the black stripe at the bottom.
Cheers,
Wei-Hao
jmurphy
Well-known member
Hi Wei-HaoIf I deselect the Replace/Update Region box, an error message (the attached image) shows up and it does not allow me to proceed further. The message box asks me to swap the reference and the target, but this is the opposite of what I want. After experimenting a bit, I found the only way to bypass this error message and to proceed was to check the Replace/Update Region box. And the result is the black stripe at the bottom.
View attachment 12150
This problem arises because you are working on the unregistered target images. To solve this problem:
- Use MosaicByCoordinates to register all your target images AND the wide field image. Add the wide field image as the last item in the MosaicByCoordinates' list. This is necessary because the first image is used to determine the angle of the mosaic, and we need your tiles to be approximately horizontal / vertical.
- Use the registered wide field image as the reference image.
- Use the 'Target' mode for each registered mosaic tile.
[Edit]
An alternative that would work with your unregistered mosaic tiles would be to use NormalizeScaleGradient. Set the reference to the wide field image (registered to your mosaic tile) and add your mosaic tile as the only target image. The gradient surface spline is then fully interpolated across the whole of the target image. The only snag is you cannot apply different levels of smoothing for the overlap and the rest of the target image. However, with only small strips outside the overlap, this might work well. It may even be the best option for a corner tile.
Last edited:
jmurphy
Well-known member
When using the solution I suggested above, you may get the following warning dialog for tiles entirely inside the wide field image:If I deselect the Replace/Update Region box, an error message (the attached image) shows up and it does not allow me to proceed further. The message box asks me to swap the reference and the target, but this is the opposite of what I want. After experimenting a bit, I found the only way to bypass this error message and to proceed was to check the Replace/Update Region box. And the result is the black stripe at the bottom.
I will try to find time to update the script to avoid this dialog when using the 'Target' option. Until then you can select Yes or No (if the tile is a subset of the reference frame, the tile order does not matter). Alternatively, in these cases, use the 'Replace/Update Region' option, using the newly created overlap preview to set the area.
Hi John and thanks for the suggestion.Color mosaics of M31 are really tricky...
The best option is to take (or borrow) a wide field image of the galaxy. This image must still be linear. Then:
View attachment 12149
- Register the wide field image to your completed mosaic.
- Split the wide field image into its R, G, B color components.
- For each of your registered stacks, use the appropriate color component of the wide field image as the reference and your stacked image as the target. Use the 'Mosaic Join' combination mode 'Target'. Instead of creating a mosaic, this will produce a copy of the target image, corrected for scale and gradient.
- Finally, mosaic all the gradient corrected stacks as before.
The wide field image does not need to be of high quality. It should still work even if it is noisy or of poor resolution. We are only using it to remove gradients. Ideally it should not have complex gradients though! If you use DBE to correct the gradients in the wide field image, do this before you register it to your mosiac to ensure that the black areas around the registered wide field image remain at zero.
Hope this helps, John Murphy
I found an old DSLR image of M31. It's not a full overlap:
so when I got to step 3 above, PMM gave me the message:
Noting your response to Wei-Hao, I did not take this option, so what should I do? I've tried ImageSolver as a pre-requisite to MosaicByCoordinates but it can't solve the DSLR image. I assume the registration process has upscaled its pixel resolution to match my main image so I entered the same resolution in ImageSolver.