Handling moon gradient captured in 80mm/480mm FL scope M42

steven_usa

Well-known member
Greetings! I am now trying wider field work with an ES ED80mm scope using a ZWO ASI1600MC-C (yes, OSC). I've gotten several good results with this equipment and the amazing processing workflow of PI.

Recently I tried collecting data on M42 while the moon was about at 1/3rd of full moon. I know good advise is to just NOT image DSOs when the moon is out -- but the weather was otherwise excellent, I couldn't resist to try for practice. Since as another thing: my Auto Guider solution is currently not available, and so I wanted to see what I could do with unguided 60 second exposures (which only later I remembered this would mean no Dithering, or at least I haven't setup SGP to have a dithering solution when not guiding). I think it can work (i.e. 180x60" versus 18x600" can both work) , but processing 100+ Lights does get much more tedious (for my old 8-core i7).


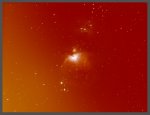
Maybe what I am seeing is more atmospheric gradient from my suburban Orange-zone area (where I do try to avoid imaging once things get below about 30deg above the horizon). But the scope was in the general direction of the moon, and the gradient seemed worse the next evening (where the moon was even brighter). I ended up with about 4 exposure hours total across two nights.

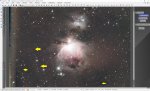
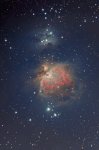
I've tried to apply ABE and DBE, but without success for this gradient. I am uploading two samples, one with a 60 minute integration (60x60sec) and another with the "full" integration of 236x60sec. There are basically there main problems with the image:

1) The lack of guiding can be noticed. In the 60 minute integration, I did manually select what I thought were the best frames (I know there are some automated processing to quantitatively decide which Lights are "good" but I just manually checked them out in Blink, and pruned out any frames with "bounced" stars or any jitter/elongations of stars -- completely subjective). I'm curious if there is a way to "tame" the round-ness of these stars, post integration.

2) The gradient across the left side, which is the main topic for this discussion. One question I have here is: does the order of the integration matter? (like inserting the 1st day then 2nd day, or can they all be mixed in any order and still get the same processing result?).

3) I bit of halo/glaring around the stars. I don't have my auto-focuser connected up for this ED80, so the focus knob was kept as-is throughout the two evenings. I don't know if the halo-effect is from being slightly out of focus, or if it's something else entirely (I used only a UV/IR filter). With OSC, I believe what needs to be done is to split the RGB channels and do some manual intervention? Is there any other "easier" option?

Very much appreciate anyone who has some time to try to stretch this sample integration.

For more background:

I Calibrated FLATS using the Master BIAS. So the integrated image is: DARK + FLAT (w/ BIAS) + LIGHT. Lights were calibrated (w/ DARK + FLATS), then Debayer, StarAlignment, final ImageIntegration.


box.com shared linked:


ALTERNATIVE, dropbox:


60x60:

236x60:
 

Attachments

  • m42_nonstrecthed.jpg
    m42_nonstrecthed.jpg
    117.8 KB · Views: 77
Last edited:
the gradient is tough. it can possibly be solved with careful DBE sample placement. i started off by using ABE with function degree 1 to remove the strong diagonal gradient and then moved to DBE.

however, in DBE i noticed some things. the flats might not have flattened the image properly; there is what looks like a circular gradient and i can see traveling dust motes in the image. so i didn't finish tweaking DBE.

was there a meridian flip involved in these images? it might make sense to integrate all the images from one side of the meridian into one master and the other side to another master, remove gradients and then integrate the masters. this could make the gradient removal process more straightforward, though i can see that it's going to be difficult no matter what.

one thing to try (that's actually somewhat advanced) would be to use ABE and ImageContainer to try to remove the gradients from the subs before registration and integration. but since you're stuck with one set of ABE parameters for all images you put in ImageContainer, it's sometimes not the best approach.

rob
 
Hi, the gradient is really a mess!.

my result is far from perfect as you can see.
You can find all the process Icons attached to this reply.

  • First step: make a copy of your image
  • Second Step: Downsample ehe copy, downsample, smooth it heavily and extract a simplified background using DBE.
  • Third Step: apply the Bckground to the original image using PixelMath.
  • Final step: Use DBE to refine the result.
You can apply this final touch more than one time to get a better result.

As I said the result isn't very good, but at least you can process a "lost" image.

As Rob said try to check your imaging workflow: the gradient is really too complex to have the moon as the only culprit.
Bye Edoardo


integration_m42_1x1_236x60s_-10C.jpg
 

Attachments

  • GradientRemoval.zip
    36.4 KB · Views: 81
Last edited:
  • Like
Reactions: dld
Thank you so much for taking a look ! Yes, the result still has some issues, but it is still very amazing what the math processing can do.

In both shared links (box and dropbox as listed in original post) I have just uploaded the master bias, dark, and flat that I used.

bias: I used 200x0.3sec stack of exposure. While this is not using the fastest speed of the ASI1600MC-C (which I think is 1/8000), based on previous advise it was suggested to actually use an exposure speed of ~0.3sec for this sensor. I'd have to lookup the thread where this was determined. In my other work with Canon DSLR, I would make a SuperBias, but I did not do so with this sensor. I've read temperature doesn't matter for bias, but I kept them at -10C anyhow.

dark: I used 100x60sec stack of exposure. Based on timestamps (since I can't truly remember) these were taken the next morning (8-9am) which means it was while we were just starting to turn around towards the sun. I may have had only a blanket covering the equipment (plus also the scope cover, of course), I keep the equipment stationary and don't bring it back inside (I am putting the TeleGizmo solar cover to the test this year! so far it has been splendid). So again, this is a dark integration collected in an early AM sunlight, as opposed enclosed in a garage or at night. I haven't verified there are no light-leaks in the focuser and imaging train - it is very bad weather this week, perhaps I can try to check this on next weekend.

flats: I used 80x0.1sec stack of exposure. It's been awhile since I imaged, but I use an Aurora flat panel (Gerd Neumann). These were taken in the evening between the 1st and 2nd evening of imaging. I just picked an exposure where the SGP showed a histogram with the data at about the halfway point, I didn't scrutinize actual ADU. The camera wasn't removed between the days, so I would hope between the UVIR filter glass, reducer glass, and the sensor clear glass covering, no new dust was introduced (as the top end of the scope is glass-lens enclosed). For flats, is dust motes on the outer scope lens a concern (within reason)? I figured they'd too out of focus to really matter, but between evenings inevitably different dust would end up on that outer lens.

The workflow I use is from TrappedPhoton's (since 2015! a very helpful resource): http://trappedphotons.com/blog/?p=693

From that, I take the advise of applying the bias to the flats when doing ImageCalibration of the Flats. Thereafter, with the Lights, I apply only the Master Dark and Master Flat - correct?


In the "full" integration of 236x60, YES there was a Meridian Flip (only during the 2nd night). I was a bit proud that was still working in SGP (hadn't imaged across meridian in a couple years) - in my previous equipment, I had an auto-focuser working. Without that, I am wondering if perhaps after a Meridian Flip maybe the focus gets compromised. There isn't much data during the "pre-flip" (stuff towards the East), maybe 20-40 exposures, so the bulk of the remainder (~200) is "post-flip" towards the West.


Let me know of any alerts/concerns from the above calibration files. The scope is still configured exactly as it was from that evening (12/26 and 12/27), I could probably still get new calibration files. Though I am not sure how sensitive these smaller 80mm scopes are to temperature changes (i.e. in regards to maintaining focus throughout an evening that could impact Flats).

If the above calibration files seem adequate, then I also have a few of the Lights from both nights available at the dropbox folder. I don't mind sharing all of them, just I am not sure how much total space I have available in this link share:

night1 (a few from start, middle, end)
night2 (a few from start, middle end)

UPDATE: Light from both nights also added into box link.


Very much appreciate the help! (I tried an OAG, but the prism-height wasn't adjustable and it was causing basically "diffraction-spikes" in certain stars on one side -- so then I tried a 100m FL guide scope lens with C2 mount, but it was "floppy" and couldn't align easily/straight with the main scope; so I've ordered a proper OAG, but may take a few more weeks to arrive given current circumstances)
 
Last edited:
i think a few calibrated images would be enlightening... and maybe the flat, bias and dark masters.

edit: oh i see the calibration masters are in the box link.
 
also a flat sub could be interesting to see if they are exposed properly. the master's been normalized so it's a little hard to tell.
 
I've added a folder into both links called "calibration_samples" with 3x samples of each sub (first one, middle, and last). Therein:

calibrations_0.1 is the FLAT subs
calibrations_0.3 is the BIAS subs (odd for bias exposure to be longer than flat, but see the explanation earlier)
calibrations_60 is the DARK subs

All are suppose to be RAW16 with ZWO ASI1600MC-C set to 1x1, 0 gain, 10 offset, -10degC on cooler, same resolution.

Also added more NIGHT1/NIGHT2 subs in the dropbox link (not enough space available for all of them at this time):


M42 data for anyone to use (collected night of Dec 26 2020 and Dec 27 2020 from Texas)
 
Last edited:
astroedo/Edoardo : thank you for sharing the processing steps. I've stepped through those, it is very clever! I do get the gradient removed (to a large extent), but wow I can't match the subsequent stretch processing you did (such as just taming that bright m42 core; is that processing available?). But I'm very glad the data is capable of this result (and new 0.8 reducer seems to be adequately spaced), this despite the mix of city light pollution and lunar light Did you use the longer exposure version, 3.9hr, as the starting point?

In my own example below, is the "lines" at the yellow arrows what you guys are saying might be a concern from the flats? (appearing as migrant-motes? they aren't "natural" stretch marks in the dust? :D {I am teasing -- hopefully review of the master calibrations will help explain, do they appear in the "regular"/shorter 60x60 integration?})


pfile/Rob: To try to shorten up all I said earlier -- yes there was a meridian flip, included in the longer 3.9hr integration (which had every reasonable sub from both nights included), but not in the shorter 1hr integration (where I hand picked from the first-night only). I could probably just remove the 40-60 or so subs that were before the flip from that 2nd night, and try that. The master calibration files and a few corresponding individual subs should now be available in dropbox link earlier, as well as a few of the Light subs.


Does the ORDER of subs during an ImageIntegration matter? I generally just always put them in the order they were taken (basically filestamp order), which means I tend to get "worse" subs at the end as things get below 30-40 degrees above horizon and more into the city-glow.

Thank you so much for taking time to assist and review -- and Happy New Year :)
 

Attachments

  • Untitled.jpg
    Untitled.jpg
    803.5 KB · Views: 70
Last edited:
i havent had a chance to look thru all this stuff... but:

@pfile/Rob: To try to shorten up all I said earlier -- yes there was a meridian flip, included in the longer 3.9hr integration (which had every reasonable sub from both nights included), but not in the shorter 1hr integration (where I hand picked from the first-night only). I could probably just remove the 40-60 or so subs that were before the flip from that 2nd night, and try that. The master calibration files and a few corresponding individual subs should now be available in dropbox link earlier, as well as a few of the Light subs.

i looked at a single subexposure and the complex gradient was apparent just in that one sub. there seems to be brightness in the upper left and lower right, which i interpreted in the integration to be the superposition of the same gradient but reversed as the telescope flipped. but i don't think that's the case.

so something is funny. perhaps as a control you should shoot this with no moonlight to see what you get in the best circumstances.

Does the ORDER of subs during an ImageIntegration matter? I generally just always put them in the order they were taken (basically filestamp order), which means I tend to get "worse" subs at the end as things get below 30-40 degrees above horizon and more into the city-glow.

the order shouldn't much matter, but all the SNR increments and stuff are computed against the reference frame, which is the first sub in the list. i guess as best practice you might put the 'best' subframe as the first - highest SNR/lowest FWHM - but again i don't think that's a requirement.

rob
 
A more complete upload is available at the box link (and better organized by sub-folders):


This includes:
- ~60 each of the raw calibration files (bias, dark, flat, copied to subfolders with these corresponding names)
NOTE: I have >100 available, but for space reasons just including the first 60 and last few for comparison.

- my original integration attempts of these calibration files (master bias, dark, flat, where the fiat is calibrated w/ biases included)

- 119 of first-day 60-second Lights (no meridian-flip on this evening, while M42 was slightly to East at the start, the mount felt it was close enough to meridian already and oriented itself for West tracking)

- 63 of second-day 60-second lights (meridian flip occurs between index #62 and #64, which means 16x towards west, 47x towards east), clouds came in which is why I had to stop imaging after the flip; you can see a bit of the clouding after #83)

- my original full integration attempts
NOTE: 236x60 and 119x60; the 236x includes "everything" I had from the two nights (including an additional 54x that i had marked as "bad" since I just wanted to see how the integration came out), while the 119x is just the first night of data


This was unguided and there was some drift throughout the session, and no Dithering. Would like opinions on:
- anything faulty with the calibration files (flats in particular)? (I haven't yet figured out the SGP Flat Wizard)
- I only used an UV/IR filter, is some other filter recommended with this OSC?
- is gradient due to moon, or more just normal surrounding light pollution? (attach below is the moon arrangement I had during the start of that evening)
- any "stretch" suggestions (I've done some DBE, BN, colorCalibration, still new on DynamicPSF and masking)


Weather is still poor here, but I do plan to collect on M42 again without the moon-light when I can.


Attachments

  • Untitled.jpg
    Untitled.jpg
    283.6 KB · Views: 54
Perhaps some of the swirls are from the UVIR filter - it may not have been as clean as it should have been. I tried to re-image M42 last night with no moon -- but I was also trying a new OAG, and I ended up "wasting" the evening trying (and failing) to get the OAG in focus (even after waiting for the moon rise after 1am). I'm giving up on OAG and going back to a side-by-side, my mount can handle the weight. But it was a nice evening and at least I saw many nice meteors. Also, it seems every night I am seeing either the ISS or various satellites (every time I redo the polar alignment and am looking at Polaris, I see 2 or 3 "slow" moving objects going across that north pole); it just seems a lot more traffic up there here in 2020 than when I started imaging back in 2013. A situation I imagine that will continue to expand in the coming years.
 
Ok, FINALLY another chance to collect data with no moon this time.

Could the gradient earlier have been from dew? I don't think my dew heater was working (one of the "flat" wires had been twisted over time and looked separated, my fault); I've replaced it with a new one.

Also I got the OAG focus dialed in, cleaned up all the glass, and finally some clear skies. Also swapped over to the larger CGEM-DX, steadier tracking, think I'll have at least a couple hours of data.

With the ASI1600MC-C, I'm not sure what the stock sensor glass is covered with. I assume it's just a clear - but just not sure if I need a UVIR filter or not (OSC in a red/orange zone - normal would with DSLR, not sure on the ASI1600MC). Anyway, I kept it in.


Re: This is a re-test to see if the extensive gradient is just normal city-light pollution or something else along the optics. Note I just imaged 60deg to 30deg above the horizon -- think anything below 30deg gets into the local atmospheric noise too much to be worth processing.
 

Attachments

  • Untitled.jpg
    Untitled.jpg
    476.9 KB · Views: 51
Last edited:
New results were decent. Attached is 174 minutes integrated (no moon), also across two different evenings (even different flats). Still some issues, but at least not any excessive gradient to deal with.

Really appreciate astroedo showing all those steps, as indeed he was able to recover a "lost" image. I still can't say if the moon was really my issue, since I also cleaned optics and got the dew heater working properly again. But in general, I'll keep even further away from the moon (as in stay on the opposite hemisphere).


The issue in this 2nd version (all new data that I processed):

- faint "streaking" on the left side (I rotated this, so it would be on the "bottom" lower portion of the original image - maybe a side effect of combining the two evenings of data that used two different orientations? or it's just my imagination - and I'd say "streaks" and not banding, it's very faint tho)

- still not quite round at the corners (think that's either a} sloppy polar alignment, or b} maybe stick to 1 night of data -- I had rotated the camera between the night, OR c} the distance between sensor and reducer is still slightly off 1-2mm ? or all of the above LOL )

- I'm still learning MaskGeneration and HDRMultiscaleTransform - the M42 core I ended up with a "dark blob" that is a bit more prominent than I would have liked; but at least I can see the "4 stars" at that core, although they aren't quite as resolved as I would have liked {I got them quite resolved on my 8" scope a few years ago, now working with an 80mm}).

- this integration still has no Deconvolution, so overall still not as sharp as could be

- not really an issue, but: I made this way more saturated than usual

Anyway, I think the equipment is ok, now is just my limited processing ability :)

Thanks all!
 

Attachments

  • integratio_Cropped_BN_CC_stretchedA.jpg
    integratio_Cropped_BN_CC_stretchedA.jpg
    671.5 KB · Views: 55
Third Step: apply the Bckground to the original image using PixelMath

Hello @astroedo , I am taking the opportunity of this thread to get an information that I never found: I get a background model "BG" from an image "IMAGE", this model is obtained either from ABE or from DBE. What is the PixelMath formula wich is applied for substraction (this one I could guess but I want to double check) and for division (this one, I can't figure out, the pixel values are very small and you want to divide by something which is reprensatative of the attenuation of your optics ... ?) ?
Thanks for your help

Jean-Baptiste alias Djibi

I usually re-normalize all my subtraction/division operations, so
Subtracion: IMAGE-BG+med(BG)
Division: IMAGE/BG*med(BG)

This operetion doesn't change the median level of your image, so there is no risk of clipping data.
 
thanks a lot @astroedo I understand what I was doing wrong : I tried to divide but without *med(BG) so my new image was satured because I was dividing by very small figures,
I thought of additive normalisation and I should have taken multiplicative normalisation in this case, silly me :)
 
thanks a lot @astroedo I understand what I was doing wrong : I tried to divide but without *med(BG) so my new image was satured because I was dividing by very small figures,
I thought of additive normalisation and I should have taken multiplicative normalisation in this case, silly me :)

"The expert is a person who has made all possible mistakes in a very narrow field." (N. Bhor)
by this definition I'm very expert :ROFLMAO: ;)
 
Back
Top