Flats Problem with Nikon D800 and Astronomik Hydrogen Alpha Clip in Filter

jerryyyyy

Well-known member
Hello,

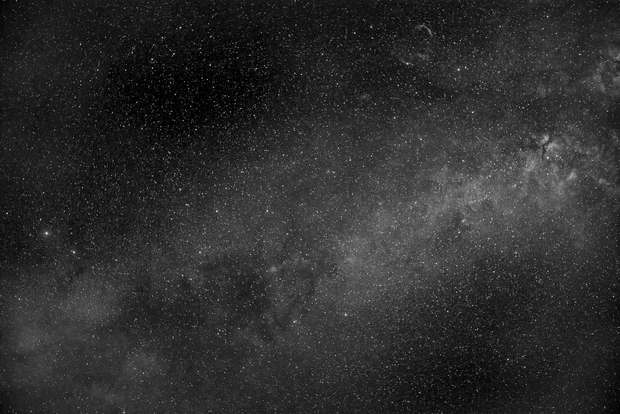
This problem is driving me bonkers. I am collecting D800 Nikon CFA images using a clip in Astronomiks Hydrogen Alpha (12nm) filter. It results in a nice image of the MilkyWay using the 50mm lens that covers a very wide area (Filed radius 23 degrees). Problem is I cannot get rid of the vignetting... Rob has tried to help me but I am a hopeless case.

The image on the left is the stacked Red debayered images unprocessed and the image on the right is a flat (one of many I have tried) with what looks like an obvious good fit to remove the nasty background in the raw image... problem is what I get in the center... looks worse that what I started with.

Anyone got some troubleshooting pathways here (I would prefer a simple solution) but will take any help...

2020-12-01 14_40_18-PixInsight.jpg


More high resolution images here:

 
In order to give qualified help, one would need at least one light, dark, flat and flat-dark (or bias) frame in FITS format each, and the correspondent masters in XISF format. Upload the data to a filehoster and post the link here.

Bernd
 
Hello, I sent you a link in a PM. Hate to post here, but can if needed.

The files start with Nikon NEF (RAW) not FITS.

Rob suggested that I debayer them and just use the Red where the HA shows up. This I have done.

In the link Folder there are the original NEF files, the debayered files and the original bias, darks and flats.

Finally, I processed the images with and without the control files and put the batchprocessing results in the folder also.

Thnaks for the help... the Nikon D800 is tough.
 
I took a look at part of your data (13 GB are too much for me to download).

The light frames:
As expected when using a Ha filter with an OSC camera, there are virtually NO data in the CFA1, CFA2 and CFA3 channels. So it will not be productive to debayer the frames in any stage of the processing workflow. I would split the channels and only process CFA0.

Bias and dark frames:
All of these calibration frames are severely clipped. In my view, there is no benefit at all in trying to apply a normal calibration with these files. Obviously this is due to in-camera processing that is done by this specific camera model.

Flat frames:
The MasterFlat is labelled "masterFlat_BINNING_1_FILTER_NoFilter_integration". Does that mean that the flat frames are taken without the Ha filter?
Which light source was used?
The image dimensions of the MasterFlat are width = 3689, height = 2462, so I assume that you applied SplitCFA and used only the CFA0 channel, am I right?

The MasterFlat has a median of 339 ADU - that is way underexposed. For a 14-bit camera, a median of about 8200 ADU would be appropriate.

I don't know whether the difficulties to obtain a decent flat field correction are due to the in-camera processing (clipping of data) or the strongly underexposed flat frames. So I recommend to take new flat frames and try it again.

Bernd
 
Thanks for the help

The light frames:
Yes, just processing CFA0 after SplitCFA

Bias and darks:
Yes, I agree can be ignored. There is internal processing in the Nikon that cannot be escaped.

Flats:
They were all taken with the filter in.. the "No Filter" is an artifact of how the FITS header is written.
I tried various light sources but settled on the iPad with light screen software. Set to 50% brightness, grey and was K = 6600. Better than dusk or t-shirt.

I cannot see where I can get the ADU readout but I ran ImageBackgroundMean and got 0.003 for the lights and 0.00027 for the flats. So as you say there is an order of magnitude difference.

In the folder:

C:\Users\Y****\OneDrive\Pictures\BackyardNIKON\Good Lights Dec 1 2020\Debayered Control Files

You will see a number of flats... these were at 125 which means 1/25s... I ran out to 1/800, but looks like I was going in the wrong direction. I tried to match the histogram and the lights were far to the left. With my CCD I try for 25,000 which is easy with Maxim/ACP software but this is a CFA.... and I am using BackYardNikon.... anyway I better go back to the iPad and make longer exposures.

I assume you think the Darks and Biases are worthless?

I went back to the iPad and did longer exposures. In the folder there is now a folder entitled:

Processed Good Lights 110s Flats

The measure for the flat I get on ImageBackgroundMean is much brighter (0.013), but I still do not have the ADU. These were at 1/10s, but the corrected lights are not much better... maybe I overshot... but you would think the processed image would have changed more... maybe I am missing something basic here.

The BPP is: BPP_10th_second_flats.xpsm

The original debayered files are in:

New Longer Flats Dec 3 2020

A typical image sub would be:

FLAT_Tv110s_400iso_2-8_20201203-14h20m04s578ms_CFA0

Thanks for the help....
 
Last edited:
I cannot see where I can get the ADU readout but I ran ImageBackgroundMean and got 0.003 for the lights and 0.00027 for the flats. So as you say there is an order of magnitude difference.
In Pixinsight you have (at least) 3 possibilities to get information about intensity values:

1) Direct readout
in View/Toolbars, the 'Readout' option has to be enabled. The readout display is on the bar at at the bottom. Clicking on the black triangle displays the menu where you can set (among other settings) the probe size (from 1 to 15 pixels) and the number format (either normalized real range or integer range). Values can be converted easily: Normalized real = Integer 16-bit / 65536 or Integer 16-bit = Normalized real * 65536.

2) Image statistics
The number format can be set in the choice box at the left side, second from the top.

3) Histogram
The number format can be set in the choice box below the histogram plot. The horizontal zoom has to be set appropriately in oder to see very low values. When you push the left mouse button inside an image view, the current value is indicated in the histogram as a colored vertical line.

If you decide to use Integer readout values, you must set 16-bit [0,65535] since the intensity values of a proprietary raw format (in your case: Nikon's NEF format) are not scaled by PixInsight's RAW format module. For a camera with a 14-bit ADC the range goes from 0 to 16383 ADU.


I assume you think the Darks and Biases are worthless?
Yes, I think so. Probably a normal image calibration is not going to result in a big improvement with this camera. Eventually darks and biases can help to attenuate hot pixels. However, you definitely will need the flat field correction.

Flat frame exposure time:
I was judging from CFA0 of the old "FLAT_Tv125s_400iso_2_8_20201130_11h41m54s000ms_CFA0.NEF". The exposure time was 1/250 s, median 338 ADU. So I wanted to suggest to try exposure times near 8200 / 338 * 1/250 s = 1/10 s and expected that such flats would result in a median of about 8200 ADU. You already captured these new flats. However, in fact your new flats with 1/10 s have only about 900 ADU -- that's weird. Probably also an effect of in-camera processing? Please try again an exposure time of 1 to 4 s for new flats.

In the meantime I will check out whether there is a chance to use the flats with 1/10 s for a reasonable flat field correction.

Bernd
 
This is extremely helpful. Now I can see the numbers.

First of all I discovered that the BPP was resulting in an RGB light master probably because I had left CFA checked even though I was inputing debayered images.

I then redid the lights without the CFA checked and then could read the K numbers across the image.

I looked at the K values (16-bit) on the L image in The Center Corners and brightest nebula

They are: 40 corner 60 center and maybe 70-80 on the nebula

The Flats are:

1/10 corner 538 center 1076
1/25 corner 223 center 402
1/50 corner 116 center 225
1/125 corner 40 center 81

So, I am getting the correct number changes as I vary the duration of the flats, BUT the signal on the lights is very low relatively.

The 1`/125 seems to be a good match, but the processed image does not look good.

In the past I have tried to increase the lights duration (they are currently at 180s) if I go to 240s I get too much sky glow and lose the nebula...

I did take the longer exposure flats but I think they will be way off.

Thanks for the help, at least I can see what is happening.

I am posting the processed files in the same directory in well-labeled folders in case you want to look at these original files.

I would look in here for the best (1/125s) effort:

C:\Users\Y***\OneDrive\Pictures\BackyardNIKON\Good Lights Dec 1 2020\Processed Good Lights Flats4 1 125th sec CFA0 Only\master

Thanks again for the big help... this is very complex in itself and the Nikon is a difficult black box.
 
Last edited:
These are the results of the differently exposed flat frames:
Code:
exposure [s] median    comment
0.100           911    underexposed
0.125          1156    underexposed
0.250          2327    underexposed
0.500          4619    underexposed
1.000          8987    well exposed
2.000         16383    overexposed
4.000         16383    overexposed

The flat frames with an exposure time of 1 s are well exposed. So I downloaded these 8 flat frames and prepared a MasterFlat. As you already found out, the direct application of this MasterFlat does not result in a good flat field correction. Although I experimented a lot with different PixelMath equations, I was not able to use this MasterFlat with success. I guess the flat frames do not match the light frames. In my view, a synthetic flat might a solution, see e.g. Synthetic flats: http://trappedphotons.com/blog/?p=756 .

Bernd
 
Hi,

Well I am glad that I am not crazy. Rob also could not come up with a solution.

I think the source of the problem is that the gradient is not only the optical/vignetting but also from sky glow because the field is so large it covers very dark overhead to varying levels of light in the two lower corners....

I tried the solution suggested in the tutorial and it did not work well since I also get a signal from the Milky Way and if I take that out, I lose everything. I guess I could try to make a custom solution like was suggested in the tutorial with a lot of clone stamping.

Sigga, on Astrobin took pity on me and did a good synthetic flat but I have not been able to convince her to tell me how she did it. Probably just a lot of hard work. I guess she tossed the flat or she would have given it to me. She is an expert on wide fields.

I think if somehow I was able to use just the upper left quarter of the image, and rotate and flip it into the other three corners, that might be relatively symmetrical.

DBE and ABE do not work too well either. If they did, would not be working on flats.

My goal was to get a long mosaic of these images... this one covers 30 Sharpless2 objects... I have also tried to put together overlapping images to try to get rid of the artifact, but the image is so large that there is some uncorrectable distortions when you try to put together such large images into a mosaic.

This may be a bridge too far... I may discuss your suggestions with Rob over the phone tomorrow if he does not hang up on me for my pig headedness at trying to get this to work. It is very frustrating since right from the star I could see the target signal... Maybe he has some tweeks that would help.

Again thanks for your help... I put up a version with ABE used a couple times on the raw image and you can really see the signal... I wanted to get the flats to work, but I can always use a mask of sorts on this image and make it presentable.... just irritating that I cannot get an elegant solution.

JY
 
Back
Top