|
Using Masks in PixInsight |
|
|
|
Creating Masks by Channel Extraction |
||||||||||
|
|
||||||||||
|
Masks can be readily generated in PixInsight for color images through channel extraction. The ExtractChannels process allows for extraction of individual channels in different color spaces. In PixInsight LE 1.0, available spaces include RGB, HSV, CIE XYZ, CIE L*a*b* and CIE L*c*h*. To open the Extract Channels processing window, you can use the Color Spaces tool bar:
or the main menu option. Using the Extract Channels window is straightforward. You select a specific color model and the individual channels to extract, then you can drag the process drag object to the desired image and see how channels are extracted into newly created image windows:
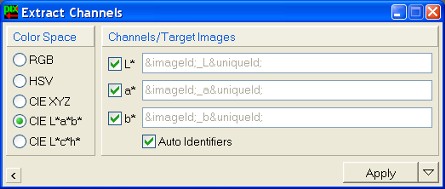
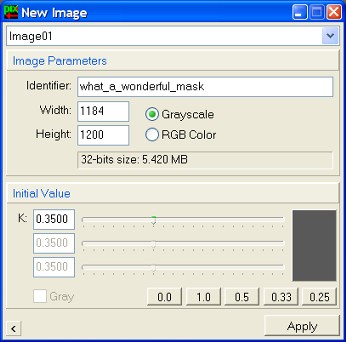
You'll probably want to leave Automatic Identifiers checked, but you can uncheck it to enter image identifiers as you wish. Default automatic identifiers are built by appending channel names to the identifier of the target image. For mask generation, you usually will not be interested in extracting chrominance channels. You can uncheck the undesired channels to avoid extracting them. Most useful masks are generated by extracting the L* luminance channel in the CIE L*a*b* space, the Y channel of CIE XYZ, or the V channel of HSV. For specific tasks, some individual RGB channels may be required. Less frequently, the color saturation channel c* of the CIE L*c*h* space can also be used for masking. When extracting channels in the CIE spaces, the target image's current RGB working space is used for all necessary color space transformations. If you want a mask for a grayscale image, just use . You may consider inverting the mask, if appropriate, by pressing Ctrl-I (), and quite probably you'll need adjusting it through CurvesTransform and/or HistogramsTransform. Finally, many masks must be blurred to make them more uniform and less dependent on small scale image features, or even to isolate certain objects, as stars. PixInsight LE does not include the Convolution process that is part of PixInsight Standard, so you cannot use something equivalent to a Gaussian blur, for example, in PixInsight LE. However, the ATrousWaveletTransform process can be applied to remove some large dimensional scales, which can be used to efficiently blur images. In PixInsight, you can use a RGB color image as a mask for another RGB color image (not for a grayscale image). When you do so, each channel of the RGB mask works as an independent mask for its counterpart in the masked image. This way you can have three masks grouped into the same image, each working for its own channel without interfering with the others. To create a RGB mask you simply make a duplicate of the image () and modify it as appropriate. Sometimes you want to adjust the strength of a particular process for the entire image, not just for some features, nor in a variable manner. Many processes include an Amount parameter, which precisely does this. But some processes don't. In these cases, a uniform mask does the job. To create a uniform mask, just select the desired image and choose . This will open the New Image processing window and will load it with the dimensions of the active image window:
The example above will generate a new image that will work as a 35% uniform mask for Image01. Note the Grayscale check box. Remember to type a meaningful identifier to make things easier when actually using the mask. Then click Apply and you're done. Of course, you can create a RGB uniform mask the same way. Just check the RGB Color check box on the New Image window and define the intial value with the uniform values you want to use for each channel.
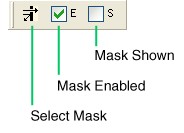
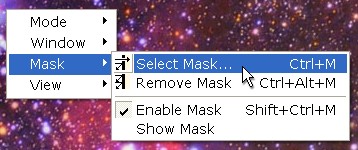
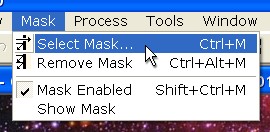
Once you've got your mask image, you must select it on the appropriate image for the mask to act as such. When selected, the new mask will come into play the next time you apply or preview a process on any view of the masked image window. When a masking relation has been established between two images, namely a mask image and a masked image, it is in effect unless either any of the two images is closed or one of the images is changed in a way such that the masking relation is no longer possible (e.g., changing the dimensions of one of the images). When an active masking relation is about to cease as a side-effect of something you're doing, you get an appropriate warning message. Bear in mind that active masking relations can exist not only between images in PixInsight, but also between images and process instances. Besides being selected, a mask can be enabled or disabled. Disabling/enabling a mask is useful when you want to compare what happens with and without mask on a particular image, but you actually don't want to unselect the mask, possibly having to reselect it later. Finally, a mask can be visible or not visible. Showing masks is a nice way to figure out what areas of a masked image are being protected by the mask. When a mask is shown, each pixel from the mask multiplies each pixel from the image before sending it to the screen. The fact that a mask is or not visible has no effect on the image itself, nor on the way a process is applied or masked: mask visibility works exclusively as a visual aid to identify masked areas on the screen. To perform all of the mask-related actions mentioned above, you can use:
|
||||||||||