1 Introduction
[hide]
This document introduces the PixInsight Reference Documentation System and describes two of its central components: the PIDoc markup language and the PixInsight documentation compiler. PIDoc and the documentation compiler have been designed to facilitate efficient authoring of PixInsight documentation in the XHTML 1.0, HTML5 and CSS level 3 formats.
The necessity for the PIDoc markup language has arised while authoring PixInsight reference documentation for existing tools and scripts, as well as different tutorials and development reference material. PixInsight is a large software project and writing and maintaining up-to-date documentation for all of its standard tools (106 processing tools and about 70 standard scripts as of writing this document) and development frameworks (PixInsight Class Library (PCL) and PixInsight JavaScript Runtime (PJSR)) is a complex and time consuming work requiring a unified, standardized documentation system available to all developers working with PCL and PJSR. Soon we realized that we need a well designed documentation system and custom, powerful tools tightly adapted to our specific requirements. We have created the PIDoc markup language and the PixInsight documentation compiler to achieve the following main goals:
- Strict separation between documentation contents and all aspects related to the appearance of the documents, such as document layouts and graphic and typographical designs. We want a system that really allows us to focus on the contents of the documents that we are authoring. While HTML with Cascading Style Sheets (CSS) pursues the same goal, we realized that we need a higher degree of isolation between contents/semantics and appearance, implemented through a custom system adapted to the specific characteristics of our documentation.
- Easy generation of the structure and organization of PixInsight's specific documents, with automatic generation of dedicated documents for PixInsight tools, scripts, JavaScript objects, image processing tutorials, processing examples and generic documents.
- Automatic generation of indexes and tables of contents with automatic section numbering and symbolic referencing of sections, tables, figures, equations and bibliographic references.
- Seamless integration of
 equations, which can be embedded as source code directly in PIDoc documents, and rendered automatically as SVG documents by the PIDoc compiler.
 - Automatic generation of interactive resources, such as mouseover image lists.
- Automatic syntax highlighting of source code blocks in the JavaScript, C++, XML, PixelMath and PIDoc languages.
- Easy-to-use, unobtrusive markup language. The PIDoc language has been designed to be very easy to learn and apply. It allows us to use any good plain text editor—such as PixInsight's Script Editor—to author complex and rich documentation quickly and easily.
- Automatic generation of high-quality XHTML 1.0 strict, HTML5 and CSS level 3 source code. HTML5 and XHTML are the primary deployment platforms for PixInsight's documentation. The PixInsight documentation compiler generates clean, standards-compliant code and makes use of carefully written cascading style sheets and JavaScript code, compatible with all widely used browsers.
Many users will note that the syntax and formatting rules of the PIDoc language resemble those of  . The resemblance is only apparent, however: it just happens that we have borrowed some formal aspects of because its elegant syntax and general design look clean and familar to us.
2 PixInsight Reference Documentation System
[hide]
A PixInsight reference documentation system consists of a local directory tree containing a set of HTML5/XHTML documents and auxiliary files, as described in this document. A documentation system forms part of all PixInsight distributions on all supported platforms since PixInsight Core version 1.6.
The following figure represents the documentation system's directory tree, along with some important auxiliary files and examples of the different document classes: generic, tool, script and object documents.
               + <documentation-root-directory>
                 |
                 + - docs
                 |   |
                 |   + - PixInsightDocument1
                 |   |   |
                 |   |   + - images
                 |   |   + - PixInsightDocument1.html
                 |   |
                 |   + - PixInsightDocument2
                 |   |   |
                 |   |   + - images
                 |   |   + - PixInsightDocument2.html
                 |   .
                 |   .
                 |   .
                 |
                 + - pidoc
                 |   |
                 |   + - css
                 |   |   |
                 |   |   + - pidoc-common.css
                 |   |   + - pidoc-generic.css
                 |   |   + - pidoc-highlight.css
                 |   |   + - pidoc-pjsr-auto.css
                 |   |   + - pidoc-pjsr.css
                 |   |   + - pidoc-tool.css
                 |   |
                 |   + - graphics
                 |   + - icons
                 |   + - images
                 |   + - scripts
                 |   + - titles
                 |
                 + - pjsr
                 |   |
                 |   + - objects
                 |   |   |
                 |   |   + - Array
                 |   |   + - ArrayBuffer
                 |   |   + - ArrayBufferView
                 |   |   + - Boolean
                 |   |   + - Brush
                 |   .   .
                 |   .   .
                 |   .   .
                 |
                 + - scripts
                 |   |
                 |   + - PixInsightScript1
                 |   |   |
                 |   |   + - images
                 |   |   + - PixInsightScript1.html
                 |   |
                 |   + - PixInsightScript2
                 |   |   |
                 |   |   + - images
                 |   |   + - PixInsightScript2.html
                 |   .
                 |   .
                 |   .
                 |
                 + - tools
                     |
                     + - PixInsightTool1
                     |   |
                     |   + - images
                     |   + - PixInsightTool1.html
                     |
                     + - PixInsightTool2
                     |   |
                     |   + - images
                     |   + - PixInsightTool2.html
                     .
                     .
                     .
The symbol <documentation-root-directory> represents the root of a PixInsight reference documentation system on the local file system. The scheme above shows several important subdirectories and files under the documentation system's root:
- doc/pidoc
-
This subtree contains a set of auxiliary files required for the whole system to work. In particular, the css subdirectory contains the PIDoc standard style sheets that define the appearance and layout of all PixInsight documents. The graphics, icons, images and titles subdirectories contain some required raster images and vector graphics (in PNG and SVG formats, respectively), and scripts stores a number of JavaScript source code files implementing the dynamic behavior of all PIDoc documents.
- doc/docs
-
This directory contains all generic documents and their auxiliary files. Generic documents are specified with the PIGenericDoc argument of the \documentclass command. For each generic document, there exists a specific subdirectory under doc/docs. For example, on the scheme above, PixInsightDocument1 and PixInsightDocument2 are two generic documents. The directory and .html file names are the same for each document, and are equal to its document identifier which must be defined with the \document command. Note also that there is an images subdirectory for each document, where all referenced images and vector graphics must be stored.
- doc/tools
-
This directory contains all tool documents and their auxiliary files. Tool documents describe PixInsight tools and are specified with the PIToolDoc argument of the \documentclass command. The structure for each tool document is similar to the structure that we have described for generic documents: a specific subdirectory under doc/tools and an images subdirectory for each document. For example, PixInsightTool1 and PixInsightTool2 are two tool documents on the scheme above. As happens with generic documents, the directory and .html file names are the same for each document, but they correspond to a tool identifier that must be defined with the \tool command.
- doc/scripts
-
Similar to the doc/tools directory, but containing all script documents and their associated files. Script documents describe PixInsight scripts and are specified with the PIScriptDoc argument of the \documentclass command. Script identifiers must be defined with the \script command.
- doc/pjsr
-
This directory stores the documentation for the PixInsight JavaScript Runtime (PJSR). Under the pjsr/objects subdirectory there is one subdirectory for each PJSR core object: Array, Boolean, Bitmap, ByteArray, etc. JavaScript object documents are specified with the the PIJSObjectDoc argument of the \documentclass command. Object identifiers must be defined with the \object command.
All documents in the system are accessible through specific user interface resources of the PixInsight Core application. In particular, tool and script documents are readily accessible from the Process Explorer window, provided that they correspond to installed modules or featured scripts, respectively.
3 The PixInsight Documentation Compiler
[hide]
The documentation compiler translates PIDoc source code into HTML5 or XHTML documents. It not only generates documents, but also integrates them with a target reference documentation system, which we have described above.
The documentation compiler has been implemented as a script on the PixInsight JavaScript runtime (PJSR) framework, so that the compiler is readily available to all PixInsight users on all supported platforms. The following screenshot shows the compiler's graphical interface for the version available as of revising this document.
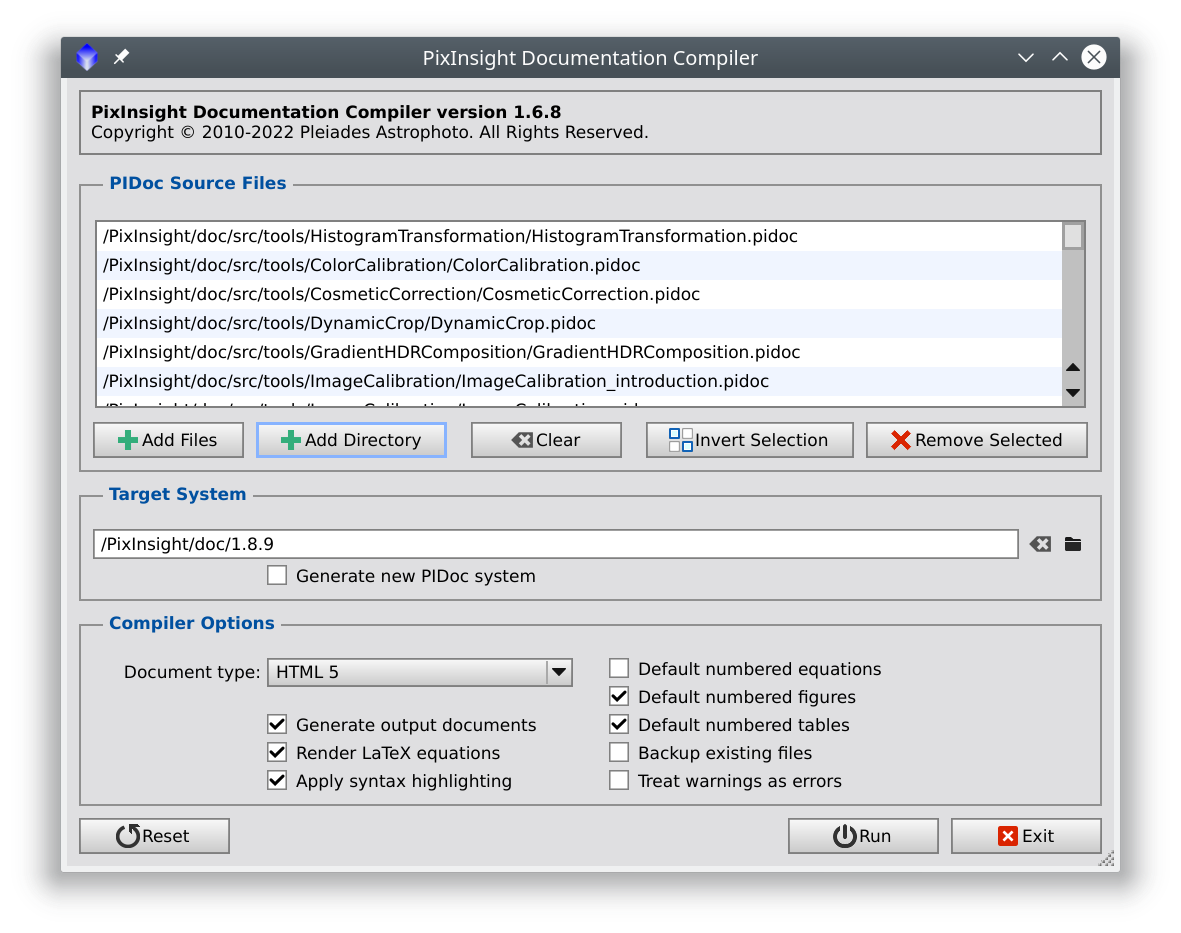
As you can see, the documentation compiler is rather easy to use. In most cases you just have to select your .pidoc files and click the Run button. The compiler will then parse the file(s) selected and will report any errors and warnings on the console. If there are no errors, the output document together with all referenced images will be generated and integrated with the target reference documentation system.
The section allows you to select and manage one of more PIDoc source files for compilation. You can select a set of .pidoc files on the same directory by clicking the button, or click to add all existing .pidoc files on a directory tree recursively. Keep in mind that if your project consists of several .pidoc files managed with the \include command, you must select only the unique .pidoc file that includes—either directly or indirectly—the rest of them.
The section allows you to select a target reference documentation system where the compiled documents will be integrated. By default, the compiler attempts to integrate output documents with the documentation system of the running PixInsight installation. This will fail if the running PixInsight Core application has been installed on a protected system directory and your user doesn't have enough access privileges. Typically you'll create an empty documentation system on a directory where you have read/write access. You can let the compiler create a new system by checking the option the first time you compile a .pidoc file. The selected target system will be remembered across script executions.
The section allows you to control a number of important working parameters. All of these parameters can also be controlled directly from PIDoc source code with the \pragma command, where you'll find detailed descriptions.
If you use PixInsight's Script Editor to edit your .pidoc files, you can execute the PIDoc compiler script to compile the current document by selecting the command from the editor's menu, or by clicking the corresponding tool button, as shown below.

We are currently using the documentation compiler to author documentation for PixInsight tools, scripts, JavaScript objects and generic documents such as format specifications, software tutorials and image processing examples. The PIDoc markup language and the documentation compiler are works in progress. We are extending and improving them to manage more document classes and generate more and better contents. As new versions become available, this reference document will be updated to reflect the changes.
4 PIDoc Source Files
[hide]
A PIDoc source file is a plain text file containing a set of Unicode characters encoded in UTF-8. Valid PIDoc source code must comply with the conditions and rules set forth in this document.
PIDoc source files should have the .pidoc file extension. Although this is not mandatory, users are encouraged to use the standard .pidoc file extension for all PixInsight documentation they produce.
Starting from version 1.6 of the documentation compiler, large documentation projects can be structured as multiple .pidoc files thanks to the \include command.
5 PIDoc Lexical Elements
[hide]
5.1 Commands
A command performs a specific action to identify, organize or define the structure of a document, or to generate document contents such as words, paragraphs, sections, etc. Commands begin with the backslash character (\), which is the command specifier token in the PIDoc language.
Commands begin with a backslash character followed by one or more alphabetic or decimal numeric characters. For example, the following are valid commands:
\documentclass \e \table
but the following are not:
\.foo \(bar \+anything
Command identifiers are case-sensitive. For example, this command:
\section { Purpose }
is a valid command (it defines a document section whose title is Purpose), but this one:
\Section { Purpose }
will generate an 'Unknown command' compiler error. The set of valid commands for the current version of PIDoc is defined and described later in this document.
When a command applies to text items, it generally applies to the next word or block, which we'll describe below in this section.
5.2 Parameters
A command can be followed by an optional list of parameters. A parameters list is a comma-separated sequence of identifier:value pairs enclosed in square brackets. For example, in the following PIDoc definition of an image:
\image[margin_right:10px] foo.jpg
the sequence [margin_right:10px] is a parameters list. There is a single parameter in the list, namely margin_right, whose value is 10px. The value part is optional for some parameters, mandatory for others. When no parameter value is specified, the colon separator token (:) must not be used. In this example:
\table[caption,header,width:100\%]
the \table command takes three parameters: caption, header, and width.
Parameters are useful to modify the default behavior of commands. Many commands understand specific parameters, but as we have noted before, command parameters are always optional.
5.3 Text
The primary building block of text in the PIDoc language is the word. Words are sequences of one or more Unicode characters separated by the beginning of the compilation unit, by the end of the compilation unit, or by a sequence of one or more whitespace characters. Whitespace characters pertain to the following set in PIDoc:
|
Symbol |
Character name |
ASCII code |
|---|---|---|
HT |
horizontal tab |
0x09 |
LF |
line feed |
0x0a |
VT |
vertical tab |
0x0b |
FF |
form feed |
0x0c |
CR |
carriage return |
0x0d |
SP |
space |
0x20 |
As noted in the preceding table, end-of-line sequences are treated as regular word separators. This means that text lines can be freely divided vertically into smaller chunks (usually to improve readability of PIDoc source code). For example, the following fragment of a PIDoc document:
               This
               is
               a
               paragraph.
is equivalent to this one:
This is a paragraph.
Multiple contiguous whitespace characters are always collapsed into a single white space in all contexts where text is to be converted to readable contents, so for example:
               this    is some  text.
               this is some text.
are two equivalent fragments. Whitespace is never collapsed in verbatim blocks and text fragments rendered by the \verbatim and \code commands.
Besides working as word separators, white spaces are always ignored between commands, between commands and their argument words or blocks, and within parameter lists.
The next structure defining text in a PIDoc source code unit is the paragraph. A paragraph is any sequence of one or more words separated by the beginning of the compilation unit, by the end of the compilation unit, or by two or more successive end-of-line sequences. To start a new paragraph, just enter two line breaks, or leave a blank line between two successive paragraphs. For example:
               This is a paragraph.

               And this is the next paragraph. However, the next two source code lines
               just continue this paragraph, as a single line break is treated
               as a white space.
5.4 Blocks
A block is a set of PIDoc lexical elements (commands, words, paragraphs, blocks) seen as a single element by a PIDoc command. Blocks are enclosed by curly brackets ({ }). For example, if you want to apply a command such as \e (emphasize) to two or more words, you need to define a block:
Note that \e {this text is emphasized}
which produces this result:
Note that this text is emphasized
Block parsing and interpretation are recursive. For example, you could mark two of the above words as strong with the \s command:
Note that \e {\s {this text} is emphasized}
and the this text chunk would be both emphasized and strong, with the following result:
Note that this text is emphasized
Besides these simple applications, blocks allow you to define complex document structures such as sections, tables, lists, definitions, etc, with specific commands that we'll describe later in this document.
5.5 Verbatim Blocks
A verbatim block is a text fragment that the compiler does not interpret as PIDoc source code. Verbatim blocks are enclosed by the sequences '#:' and ':#'. The text within a verbatim block is used directly without modification, either to include it in the generated document, or to use it as the input data for a PIDoc command, depending on the context.
Verbatim blocks are useful to include source code written in other languages in PIDoc source files. Typically, verbatim blocks are used to provide source code to the \im and \equation commands. For example, the following fragment of PIDoc code:
               Since the standard deviation of the sample mean is \im {#: 1/\sqrt{N} :#},
               the standard deviation of the sample median is larger by a factor of
               \im {#: \sqrt{\pi/2} \simeq 1.253 :#}. From this value we can express
               the SNR increase for a median combination as

               \equation { #:
                  $$
                  \frac{\hbox{SNR}(g_{med})}{\hbox{SNR}(f_0)}
                              \propto \frac{\sqrt{N}}{1.253} \simeq 0.8 \sqrt{N} ; .
                  $$
               :# }
would be rendered as:
Since the standard deviation of the sample mean is  , the standard deviation of the sample median is larger by a factor of
  . From this value we can express the SNR increase for a median combination as
 [1]
[1]Without verbatim blocks, code would require lots of escaped characters that would make it extremely unreadable and difficult to write and maintain.
5.6 Comments
Comments can be inserted in PIDoc source code and are useful to document or describe portions of the code. A comment is any sequence of characters starting with a percent sign (%), which is the comment specifier token in the PIDoc language. When the compiler encounters a comment specifier, it ignores all text from the specifier (included) up to the next end-of-line sequence or up to the end of the current compilation unit, whichever comes first. For example, there are two comments in this PIDoc fragment:
               \table[caption] {
                  % This is a comment to say that the table caption is in the next line.
                  { This is an example table }
                  { This is the first row } { second column, first row }  % The first row
               }
5.7 Escaped Characters
When you want to include a reserved PIDoc token in a document, you must escape it with a prepended backslash. For example, if you want to include a curly bracket, you should escape it or otherwise it will be interpreted as a starting block delimiter:
This text is \{ between curly brackets. \}
The above fragment renders as follows:
This text is { between curly brackets. }
The same happens with the square brackets, which must be escaped to prevent its interpretation as parameter list delimiters, and with the backslash character, to prevent it from working as a command specifier. The following fragment:
To include a backslash you \e must escape it with a second backslash: \\
produces this output:
To include a backslash you must escape it with a second backslash: \
The comment specifier (the percent sign, %) must also be escaped to include it literally, or it will be interpreted as the beginning of a line comment:
You can write a 99.9\% of your documents with PIDoc.
You can write a 99.9% of your documents with PIDoc.
Note that escaping does not work within verbatim blocks, since these blocks are never interpreted as PIDoc source code.
5.8 HTML Character Entities
Besides Greek letters and the set of special characters supported by specific commands, PIDoc allows you to directly include the full set of HTML 5 character entities in your source code. As in HTML syntax, character entities begin with an ampersand sign (&) and end with a semicolon (;) sign. For example:
The à trous wavelet transform
results in:
The à trous wavelet transform
Character entities can also be specified in hexadecimal syntax; for example, to include the ampersand and semicolon characters literally you can specify their ASCII codes, 0x38 and 0x59 respectively, as in this example:
The &agrave; trous wavelet transform
which produces:
The à trous wavelet transform
Finally, you can enter the en dash and em dash signs with two and three successive hyphens, respectively:
            Em dashes---useful to denote parenthetical thoughts---are easy to use in PIDoc.
            En dashes can be used in compound names, as in \e { Richardson--Lucy deconvolution. }
results in:
Em dashes—useful to denote parenthetical thoughts—are easy to use in PIDoc.
En dashes can be used in compound names, as in Richardson–Lucy deconvolution.
5.9 Special Commands
Special commands can be included at the beginning of a .pidoc file to modify the way it is processed by the PIDoc compiler. All of these special commands begin with an exclamation point '!', also known as bang.
5.9.1 Require included special command
The require included special command is '!<', that is, a bang followed by a less-than symbol. If used, it must appear at the beginning of a document in a single line, and can only be preceded by white spaces or comments; otherwise it is ignored and processed as regular characters. The purpose of this special command is to prevent accidental compilation of .pidoc files intended to be included with \include commands. If one of these files is compiled as if it were a standalone document, it may cause spurious output and compilation problems. So it is good practice to write '!<' (no quotes of course) at the beginning of every included .pidoc file.
6 Document Classes
[hide]
A document pertaining to a PixInsight reference documentation system must belong to a valid document class. A document class defines the role of a document in the documentation system. It imposes a number of restrictions on the document's structure and contents to ensure coherence of the system and its correct functionality. The document class is also necessary to properly interpret and parse PIDoc source code.
Currently the PIDoc language supports four document classes:
-
Generic
-
The generic document class is a wide category comprising tutorials, papers, technical notes and other types of documentation on the PixInsight platform. For example, this is a generic document.
-
Tool
-
Tool documents are intended to describe the functionality, operation and usage of PixInsight tools, and are the basis of the reference documentation available in all PixInsight distributions.
-
Script
-
Script documents are intended to describe the functionality, operation and usage of PixInsight scripts.
-
Object
-
Object documents provide formal definitions of core and custom JavaScript objects, including technical descriptions of related algorithms and implementations, as well as source code examples.
The \documentclass command, which is mandatory for all PIDoc source files, defines the class of a document being compiled from PIDoc source code.
7 PIDoc Command Reference
[hide]
7.1 Typographic Conventions
In the following subsections we describe the set of available PIDoc commands applying a few typographic conventions to formalize items that are not part of the PIDoc syntax:
-
Monospace text
-
Used for all formal descriptions of PIDoc commands.
-
<Monospace-italics-text-between-angle-brackets>
-
Used for all metasymbols. Metasymbols are descriptive items that don't pertain to the PIDoc syntax being defined.
-
opt
-
The opt subindex is used to indicate optional language elements.
-
|
-
The vertical bar sign is used to specify one or more available options. Only one of the items separated by vertical bars can be used, depending on the context described in each case.
7.2 \a <argument-text>
Tags the <argument-text> element as a function argument. With the standard PIDoc style sheet, function arguments are rendered with a monospaced italics font.
7.3 \abstract <abstract-body>
Defines the Abstract section of the document. This command is optional for generic documents. It cannot be used for tool, script and object documents.
7.4 \acknowledgments <acknowledgments-body>
Defines the Acknowledgments section of the document. This command is optional for all document classes.
7.5 \author <author-info>
Specifies an author of the document. This command is optional for all document classes. Multiple instances of this command can be specified to define a set of distinct authors. See also the \contributor command.
7.6 \block[<block-parameters>]opt <block-body>
This command groups the contents of <block-body> into a <div> element in the output XHTML document. Other than grouping, the \block command does not apply any default shape or style to its target items. The \block command can take the whole set of block parameters. In fact, one of the main reasons for defining blocks is precisely applying block parameters to a set of elements as a whole. Block definitions can be nested (blocks inside blocks) with no specific limit.
With the current PIDoc style sheets, this command is equivalent to \group.
7.7 \box[<block-parameters>]opt <box-body>
Defines a box. Boxes are similar to figures, but are rendered in a slightly different way. With the standard PIDoc style sheet, boxes are rendered as empty panels while a figure is a panel with a solid background. Boxes also have a default text size larger than figures, although somewhat smaller than the normal paragraph text. The \box command can take the whole set of block parameters.
See also the \figure command.
7.8 \brief <brief-description>
This command is optional and can be used in all document classes. It is highly recommended for tool and script documents. <brief-description> should be a short description of the item or topic being documented, especially useful as a brief introduction to a tool's or script's purpose and functionality. The compiler issues a warning message if more than 256 characters or multiple lines are used in the brief description. The compiler automatically appends the string "[more]" with a local link to the beginning of the document's body, just after the Contents section, if present.
7.9 \c <code-text>
Tags the <code-text> element as source code. Source code text is rendered with a monospaced font. This command is useful to embed small source code fragments within paragraphs, especially in documents about software development topics.
7.10 \categories <category-id-list>
At least one occurrence of the \categories or \category commands is mandatory in a tool document, but these commands cannot be used in other document classes. <category-id-list> is a comma-separated sequence of one or more plain text process categories to which the tool being documented pertains.
7.11 \category <category-id>
At least one occurrence of the \categories or \category commands is mandatory in a tool document, but these commands cannot be used in other document classes. <category-id> is a plain text process category to which the tool being documented pertains.
7.12 \center <text>
Forces a new paragraph, if necessary, and sets the text alignment property of <text> to center. This command generates the text-align:center CSS property within the style attribute applied to the specified <text> item.
7.13 \cite <cited-text>
Tags the <cited-text> element as a cite. Cited text is rendered with a specific font style, usually italics.
7.14 \code[<code-parameters>]opt <preformatted-text>|<file-path>
Forces a new paragraph, if necessary, and includes either <preformatted-text> or the contents of a plain text file at <file-path>, without collapsing whitespace characters. This means that existing white spaces will be preserved at the left side of each text line. With the default style sheets, code text is rendered using a monospaced font within a special box with dashed borders.
The \code command recognizes the following parameters:
<language-spec> can be one of:
| none | Do not apply syntax highlighting. |
| auto | Derive the source code language from the file suffix in <file-path>. This mode can only be used along with the import parameter. |
| js | The preformatted text will be interpreted as ECMAScript 262-6 source code. |
| c++ | The preformatted text will be interpreted as C++ source code. |
| xml | The preformatted text will be interpreted as generic XML source code. |
| pidoc | The preformatted text will be interpreted as PIDoc source code. |
| pmath | The preformatted text will be interpreted as PixelMath source code. |
For example, the following fragment of JavaScript source code:
         \code[lang:js] { #:
         /*
          * Solve references
          */
         this.xhtmlSource = solveRecursively( this.xhtmlSource );
         for ( let i = 0; i < this.references.length; ++i )
            if ( this.references[i].count == 0 )
               this.warning( "Unreferenced bibliographic reference '" +
                             this.references[i].name + "' (= Reference " + i.toString() + ")" );
         :# }
would be rendered as follows:
   /*
    * Solve references
    */
   this.xhtmlSource = solveRecursively( this.xhtmlSource );
   for ( let i = 0; i < this.references.length; ++i )
      if ( this.references[i].count == 0 )
         this.warning( "Unreferenced bibliographic reference \'" +
                       this.references[i].name + "\' (= Reference " + i.toString() + ")" );
Note the use of a verbatim block to include the JavaScript souce code fragment directly in PIDoc code. See also the \verbatim command.
7.15 \constant[<method-parameters>]opt <formal-description> <description>
Defines a constant value property subsection. This command can only be used for object documents. <formal-description> is a plain text formal description (in a suitable metalanguage) of a constant value property of the object being documented, and <description> is a description of the property's value, purpose, etc. The compiler automatically creates a Constants section if one or more constant value properties are defined.
The \constant command recognizes the same parameters as the \method command.
Example:
         \constant { Number Math.PI } {
            The constant \pi = 3.141592...
         }
See also the \property command.
7.16 \constructor[<method-parameters>]opt <formal-description> <description>
Defines a constructor function subsection. This command can only be used for object documents. <formal-description> is a plain text formal description (in metalanguage) of a constructor function of the object being documented, and <description> is a description of the constructor's parameters, functionality, usage, etc. The compiler automatically creates a Constructors section if one or more constructor functions are defined.
The \constructor command recognizes the same parameters as the \method command.
Example:
         \constructor { new ByteArray( ByteArray a[, uint startIndex[, uint count]] ) } {
            Constructs a new \c ByteArray object with a copy of a subset of \a count bytes from
            the specified \c ByteArray \a a, starting at the specified \a startIndex position.
         }
         \constructor { new ByteArray( String s ) } {
            Constructs a new \c ByteArray object with a duplicate of the specified string encoded
            in UTF-8.
         }
7.17 \contributor <author-info>
Specifies the name of somebody who has contributed by writing or helping with parts of the document. This command is similar to the \author command. It is optional for all document classes. Multiple instances of this command can be specified to define a set of distinct contributors.
7.18 \copyright <copyright-info>
Specifies the copyright information for the document. This command is optional for all document classes.
7.19 \d <deleted-text>
Tags the <deleted-text> element as deleted. Deleted text is represented with a strikethrough font decoration.
7.20 \definition[<block-parameters>]opt <definition-items>
Forces a new paragraph, if necessary, and builds a definition list with the specified <definition-items>. Definition list items are term-description pairs. The <definition-items> argument must be a block with an even number of elements, as each definition list item is composed of two elements. For example:
         \definition {
            { Term 1 } { Description 1 }
            { Term 2 } { Description 2 }
            { Term 3 } { Description 3 }
         }
The \definition command accepts the set of block parameters.
7.21 \description <description-body>
Defines the Description section of the document. This command is optional for all document classes.
7.22 \discussion <discussion-body>
Defines the Discussion section of the document. This command can only be used in generic documents. It can be appropriate mostly for research papers and similar academic documents.
7.23 \division <division-title> <division-body>
In the current versions of PIDoc, this command is equivalent to \subsection.
7.24 \document <document-id>
Specifies the identifier of the document being compiled. <document-id> is a plain text unique document identifier. This command is mandatory for generic documents, but it cannot be used in tool, script and object documents. For tool documents, the \tool command is mandatory and must be used for the same purpose. Similarly, the \script and \object commands are reserved to identify script and object documents, respectively.
7.25 \documentclass <document-class-id>
The \documentclass command is mandatory and must be present only once as the first command in every PIDoc source code unit. It specifies the document class of the document being defined, and is necessary to correctly interpret and parse the rest of PIDoc source code elements.
Currently the following values are valid for <document-class-id>:
| PIGenericDoc | Generic document class |
| PIToolDoc | Tool document class |
| PIScriptDoc | Script document class |
| PIJSObjectDoc | Object document class |
7.26 \dref <document-id> <link-text>
Creates a link to a generic document within the target reference documentation system. <document-id> is the plain text unique identifier of a generic document (see the \document command), and <link-text> is a word or block that will be linked to the specified document. If you use this command, you should also include the linked document in a list of related documents; see the \relateddocument command.
7.27 \e <emphasized-text>
Tags the <emphasized-text> element as emphasized. Emphasized text is rendered with a specific font style, usually italics.
See also the \s command.
7.28 \eqnnum <equation-id>
Creates an equation number through a symbolic reference. <equation-id> is a plain text identifier of an equation defined in the document (see the \equation command and its numbered parameter). This command is similar to \eqnref, but it only generates the equation number without a link to the equation.
The compiler replaces symbolic equation references by actual equation numbers automatically. For example, given this code fragment:
         \box {
            \equation[numbered:noise_evaluation_weighting_function] { #:
               $$
               w_i = \frac{1}{(k_i \cdot {\sigma_n}_i)^2} \; ,
               $$
            :# }

            In Equation \eqnnum noise_evaluation_weighting_function,
            \im {#: {\sigma_n}_i :#} is the standard deviation of the
            noise in the \im {#: i\hbox{th} :#} input image.
         }
this is the result:

 is the standard deviation of the noise in the
  input image.
7.29 \eqnref <equation-id>
Creates a symbolic reference to an equation. <equation-id> is a plain text identifier of an equation defined in the document (see the \equation command and its numbered parameter). Unlike \eqnnum, this command generates the equation number and a link to the equation in the document.
The compiler replaces symbolic equation references by actual equation numbers automatically. If we take the same source code example we used for the \eqnnum command, but replacing \eqnnum by \eqnref,
         \box {
            \equation[numbered:noise_evaluation_weighting_function] { #:
               $$
               w_i = \frac{1}{(k_i \cdot {\sigma_n}_i)^2} \; ,
               $$
            :# }

            In Equation \eqnref noise_evaluation_weighting_function,
            \im {#: {\sigma_n}_i :#} is the standard deviation of the
            noise in the \im {#: i\hbox{th} :#} input image.
         }
the result is as follows:
7.30 \equation[<equation-parameters>]opt <latex-source>|<file-path>
Defines a equation embedded in PIDoc source code. This command creates a new paragraph, if necessary, and renders the specified LaTeX source code as an SVG image. This command requires a working LaTeX installation available on the local machine. The compiler generates all the required temporary files and invokes the necessary LaTeX executables and conversion utilities automatically.
If you need an equation or formula inserted right in the text of a paragraph, see the \im command for inline math.
The \equation command accepts the following parameters:
| inline | The argument is interpreted as <latex-source>, which must be a fragment of valid LaTeX source code. This is the default working mode. |
| import | The argument is interpreted as <file-path>. The contents of the specified file are loaded as Unicode plain text encoded in UTF-8. The file must contain valid LaTeX source code. |
| numbered:<equation-id>opt | Defines a numbered equation. Equation numbers are assigned automatically by the PIDoc compiler. They are rendered right-justified and vertically aligned with the top of the equation. If the optional <equation-id> is specified, it can be used to create symbolic references with the \eqnref and \eqnnum commands. |
| unnumbered | Disables automatic numbering for this equation. No equation numbers are assigned or generated for unnumbered equations. |
| scale:<equation-scale> | Defines a scaling factor for rendering the equation. <equation-scale> is a plain text representation of a floating point number 0 < scale ≤ 10. It is a multiplying factor that will be applied to reduce or enlarge the equation rendition as a vector image (in SVG format). The default equation scale is computed automatically by the PIDoc compiler as a function of the fonts applied by the default style sheets, and corresponds to a scaling factor of 1.0. So for example a scaling factor of 0.9 will render an equation at a 90% of its normal size. |
| <block-parameters> | The \equation command supports the whole set of block parameters. |
For equations defined directly in PIDoc source files, typically you'll have to embed your LaTeX source code as a verbatim blocks, mainly because PIDoc and TeX use similar grammar and syntax rules. Without verbatim blocks, most equations would require lots of escaped characters that would make them extremely confusing and difficult to understand and maintain.
The PIDoc compiler automatically generates the required document prolog and all the necessary LaTeX commands to render the equation optimally for its inclusion as a vector image in the output document. The compiler sends the following source code to the latex executable:
         \documentclass[landscape,a0]{article}
         \usepackage[paperwidth=100cm,paperheight=100cm,margin=0pt]{geometry}
         \pagestyle{empty}
         \begin{document}
         \noindent
         <tex>
         \end{document}
where <tex> represents the specified LaTeX source code, either as <latex-source>, or as the contents of an existing file at <file-path>.
For the \equation command to work, the local LaTeX installation must provide access to the following executables through directories included in the PATH environment variable:
         latex
         dvips
         epstopdf
         pdf2svg
Installing LaTeX is normally a trivial task on most UNIX/Linux distributions. On OS X we have tested the MacTeX distribution with success. On Windows we have not attempted to install or use LaTeX, but from what we have seen MiKTeX should work.
Example:
         \equation { #:
            $$
            U(S,V,n)=\left(\frac{\partial U}{\partial S}\right)_{V,n} S
                     + \left(\frac{\partial U}{\partial V}\right)_{S,n} V
                     + \left(\frac{\partial U}{\partial n}\right)_{S,V} n \;.
            $$
         :# }
 [4]
[4]7.31 \eventhandler[<method-parameters>]opt <formal-description> <description>
Defines an event handler subsection. This command can only be used for object documents. <formal-description> is a plain text formal description (in metalanguage) of an event handler method of the object being documented, and <description> is a description of function parameters, functionality, usage, etc. The compiler automatically creates an Event Handlers section if one or more event handlers are defined.
The \eventhandler command recognizes the same parameters as the \method command.
Example:
         \eventhandler { Boolean|void Control.onKeyPress( uint keyCode, uint modifiers ) } {
            Receives a key press event with the specified \a keyCode and keyboard
            \a modifiers. May return true if the object captured the event;
            otherwise the key press event may be propagated to parent Control objects.
         }
7.32 \fignum <figure-id>
Creates a figure number through a symbolic reference. <figure-id> is a plain text identifier of a figure defined in the document (see the \figure command and its numbered parameter). This command is similar to \figref, but it only generates the figure number without a link to the figure.
The compiler replaces symbolic figure references by actual figure numbers automatically. To understand how symbolic references work, see the \eqnnum command.
7.33 \figref <figure-id>
Creates a symbolic reference to a figure. <figure-id> is a plain text identifier of a figure defined in the document (see the \figure command and its numbered parameter). Unlike \fignum, this command generates the figure number and a link to the figure in the document.
The compiler replaces symbolic figure references by actual figure numbers automatically. To understand how symbolic references work, see the \eqnref command.
7.34 \figtag
This command can only be used within the body of a \figure command. \figtag creates a text fragment with an automatically generated figure number, suitable to be included in a figure title or caption. This command generates a text fragment of the form:
Figure <n> —
where <n> is the number of the current figure. For example, this fragment:
         \figure {
            \figtag A Bootstrap Estimation of the Standard Error of the Median
            ...
         }
would generate a figure starting with the following text:
Figure 1 — A Bootstrap Estimation of the Standard Error of the Median
For this command to work, the figure being defined must be numbered, either implicitly or explicitly with a numbered parameter.
7.35 \figure[<block-parameters>]opt <figure-body>
Defines a figure. Figures are blocks rendered inside special panels with distinctive borders and background, and a small font size. The \figure command can take the whole set of block parameters.
See also the \box command.
7.36 \group[<block-parameters>]opt <group-body>
This command groups the contents of <group-body> into a <div> element in the output XHTML document. Other than grouping, the \group command does not apply any default shape or style to its target items. The \group command can take the whole set of block parameters. In fact, one of the main reasons for defining groups is precisely applying block parameters to a set of elements as a whole. Group definitions can be nested (groups inside groups) with no specific limit.
With the current PIDoc style sheets, this command is equivalent to \block.
7.37 \hs[<spacing-parameters>]opt
Inserts a horizontal space. The \hs command generates a <span> element with a style="margin-left:<n>;" attribute in the output XHTML document, where <n> represents the spacing length in CSS syntax. By default <n> is 1em (a space equivalent to the width of an 'm' character in the current font), but the spacing length can be controlled with the following parameter:
See also the \vs command.
7.38 \i <inserted-text>
Tags the <inserted-text> element as inserted. Inserted text is represented with an underlined font style.
7.39 \im[<inline-equation-parameters>]opt <latex-source>
Defines an inline equation embedded in PIDoc source code. This command renders the specified LaTeX source code as an SVG image and inserts it as an inline block element in the current paragraph. This command requires a working LaTeX installation accessible on the local machine. For information on PIDoc LaTeX support and system requirements, see the \equation command.
The \im command accepts the following parameters:
| scale:<equation-scale> | Defines a scaling factor for rendering the equation. For a description of this parameter, see the \equation command. |
| <block-parameters> | The \im command supports the whole set of block parameters. |
LaTeX source code embedded with the \im command is always enclosed between "$" signs by the PIDoc compiler before sending it to the LaTeX interpreter, so inline equations are always rendered in the math TeX environment (which is the correct environment for formulas that appear right in the text). Note that this is not true for the \equation command, where you must select the appropriate TeX environment in each case.
7.40 \image[<block-parameters>]opt <image-file-path>
Includes an image in the current document. <image-file-path> is a path specification to an existing image file in the local filesystem. The JPEG and PNG formats are the only two bitmap image formats recommended for the sake of compatibility, as they are open standards supported by all browsers. For scalable vector-based graphics, we recommend the standard SVG format. Currently the latest versions of the principal browsers support this format. SVG is the preferred format for scalable contents such as mathematical formulae, graphical function representations, schemes, etc. In fact, the \equation and \im commands automatically generate and insert SVG images.
If <file-path> is a relative path, then it is considered as relative to the directory where the current source PIDoc file is stored. This means that if <image-file-path> specifies just a file name, then the image file should be in the same directory as the source file currently being compiled. The compiler automatically copies all linked image files to an images subdirectory of the directory where the output XHTML file is generated, within the target reference documentation system's tree, and adjusts the generated links accordingly. This guarantees that the generated documentation is self-contained and not dependent on resources external to the target reference documentation system.
The \image command can take the whole set of block parameters. If you need swapping two images in response to mouse over events, see the \imageswap command. For more complex constructs based on mouse over events see the \imageselect command.
7.41 \imageselect[<block-parameters>]opt <image-selection-items>
Builds an image selection from the specified list of image selection items. An image selection consists of a stack of images from which only one is visible at a given time. The reader can select one of the images by hovering a specific text fragment with the mouse cursor. When an image is selected this way, it replaces the image currently being shown at the same location in the document. This is a widely used and extremely efficient mechanism to compare a set of images, known as mouse over comparison.
The list of image selection items can be formally defined as:
         <image-selection-items> ::
            <image-selection-item>[<image-selection-items>]

         <image-selection-item> ::
            <image-file-path> <image-selection-text>
where <image-file-path> is a path specification to an existing local image file (see the \image command for more information), and <image-selection-text> is the associated text fragment for selection of the image by mouse hovering.
The \imageselect command accepts the following parameters:
| menupos:<position-spec> | Defines the location of the image selection text items. <position-spec> can be one of: left, right, top, bottom. By default the image selection menu is generated at the bottom of the image selection block, that is, under the image. |
| menu_pos:<position-spec> | A synonym for menupos. |
| imageWidth:<position-spec> | Specifies the value of the width CSS property for the image embedded in the image selection. The default is undefined. |
| image_width:<position-spec> | A synonym for imageWidth. |
| imageHeight:<position-spec> | Specifies the value of the height CSS property for the image embedded in the image selection. The default is undefined. |
| image_height:<position-spec> | A synonym for imageHeight. |
| imageBorder:<border-spec> | Specifies the value of the border CSS property for the image embedded in the image selection. The default is undefined. |
| image_border:<border-spec> | A synonym for imageBorder. |
| <block-parameters> | The \imageselect command supports the whole set of block parameters. |
Example:
         \figure {
            \figtag \s {Picture Operations}
            \imageselect[imageWidth:200px,imageHeight:auto,menupos:right] {
               picture-add.png      { Add }
               picture-attach.png   { Attach }
               picture-check.png    { Verify }
               picture-delete.png   { Delete }
               picture-download.png { Download }
               picture-edit.png     { Edit }
               picture-favorite.png { Add to favorites }
               picture-ok.png       { Accept }
            }
         }

For simpler image comparisons of just two images, see the \imageswap command.
7.42 \imageswap[<block-parameters>]opt <image1-file-path> <image2-file-path>
Generates an image that is replaced by other image automatically when the mouse cursor enters it. This effect is known as swapping images based on mouse over events, and is an extremely useful resource to compare two images visually. <image1-file-path> is the default image, which is always shown when the mouse cursor is not over the image, and <image2-file-path> is the image that appears when the mouse cursor enters the image area. This command generates a small text line under the image with the text '[mouseover]', to let the user be aware of this functionality.
The information given for the \image command is also applicable to \imageswap, including the fact that it accepts the set of block parameters.
Example:
         \box {
            \imageswap[imageWidth:200px,imageHeight:auto,float] folder.png folder-open.png
            \group {
               \vs[length:120px]
               \s {Hover the image with the mouse pointer to open the folder.}
            } \nf
         }

Hover the image with the mouse pointer to open the folder.
For more complex image comparisons see the \imageselect command.
7.43 \include <pidoc-source-file-path>
Tells the PIDoc compiler to load the contents of a file and process them as if they appeared in the current source file at the point where the \include command appears.
The specified <pidoc-source-file-path> must be a path to an existing file on (or accessible from) the local file system. If the specified path is relative, then it is considered as relative to the directory where the current source PIDoc file is stored, that is, relative to the file where the \include command appears. The file will be loaded as Unicode plain text encoded in UTF-8. The compiler automatically adjusts all information, warning and error messages to include accurate file names and line numbers corresponding to the actual file being compiled in each case.
Included files can be nested without specific limit, that is, an \include command can appear in a file that has been included from another file, generating "parent" and "grandparent" relations, and so on.
The \include command allows you to organize your documents into smaller logical blocks that can be handled and maintained more efficiently. This is particularly important for large documentation projects, where PIDoc source files can easily consist of many thousands of source code lines.
Examples:
            \include SectionThree.pidoc
            \include {A file with spaces.pidoc}
In the second example, note that if the included file name contains white spaces, you should group all the chunks into a block. Otherwise the \include command would see just the first word ("A" in this case).
Note— It is good practice to write a require included special command (!<) at the beginning of each file intended to be included. In this way, if you compile one of these files as an independent document by mistake (for example, by loading all .pidoc files on a folder with the Documentation Compiler script), it will be ignored by the compiler and no output will be generated.
7.44 \inherited <inheriting-objects-list>
Defines a list of objects that inherit properties and methods from this object. This command can only be used for object documents. <inheriting-objects-list> is a comma-separated list of object identifiers. The compiler automatically creates a paragraph entitled "inherited by", with links to the specified objects, at the top of the output document, just before the table of contents.
Example:
         \inherited {
            Edit, Label, ScrollBox, TextBox
         }
See also the \inherits command.
7.45 \inherits <inherited-objects-list>
Defines a list of objects from which this object inherits properties and methods. This command can only be used for object documents. <inherited-objects-list> is a comma-separated list of object identifiers. The compiler automatically creates a paragraph entitled "inherits from", with links to the specified objects, at the top of the output document, just before the table of contents.
Example:
         \inherits {
            Control
         }
See also the \inherited command.
7.46 \introduction <introduction-body>
Defines the Introduction section of the document. This command is optional for all document classes.
7.47 \k <key-id>
Tags the <key-id> element as a key or a key combination. Keyboard text is rendered with a specific font color and style. In the default PIDoc style sheet, keyboard text is dark red and uses a monospaced font.
7.48 \keywords <keyword-list>
Specifies a set of one or more keywords for the document. <keyword-list> is a sequence of one or more comma-separated plain text keywords, which must be specified by decreasing order of significance or relevance. This command is optional for all document classes, although including it is highly recommended.
7.49 \label <label-id>
Defines a label in the document. A label can be used to create local links to specific locations in the document. Local links are created with the \lref command. <label-id> is the plain text unique identifier of the label.
7.50 \left <text>
Forces a new paragraph, if necessary, and sets the text alignment property of <text> to left. This command generates the text-align:left CSS property within the style attribute of the specified <text> element.
7.51 \list[<list-parameters>]opt <list-items>
Forces a new paragraph, if necessary, and builds an ordered or unordered list with the specified <list-items>. The <list-items> argument must be a block. The available <list-parameters> are:
| unordered | Builds an unordered (bulleted) list. This is the default mode. |
| ordered:<starting-value>opt | Builds an ordered (numbered) list. The optional <starting-value> parameter value specifies the starting value for list item numbering. The default starting value is one. |
| spaced | Creates a list where items are separated with additional vertical spacing. By default, list items are rendered in a vertically compact style. |
| <block-parameters> | The \list command accepts the whole set of block parameters. |
Example of unordered list:
         \list {
            { This is the first list item. }
            { The second list item. }
            Third.
         }
- This is the first list item.
- The second list item.
- Third.
7.52 \lref <label-id> <link-text>
Creates a local link to an existing label in the current document. Labels can be defined with the \label command. <label-id> is the plain text unique identifier of an existing label, and <link-text> is a word or block that will be linked to the specified label.
7.53 \m <menu-item>
Tags the <menu-item> element as a menu item or a menu selection text. Menu items are rendered with a specific font color and style. In the default PIDoc style sheet, menu items are dark red and use a monospaced font.
7.54 \make[<make-parameters>]opt
Generates the output XHTML or HTML5 document and integrates it with the target reference documentation system. This command should be present in all PIDoc source files whose purpose is to generate documents. The \make command can legally be omitted (the compiler issues a warning in such case) with the purpose of verifying the syntax of the PIDoc source code. However, the documentation compiler has an option to disable output, which is more efficient as it doesn't require source code modifications.
Specifying additional commands after the \make command is illegal and generates a compiler error. \make must be the last command in a PIDoc compilation unit.
The \make command recognizes the following parameters:
| noauthors | Prevents generation of authors information. If this parameter is specified, author names will not be present in the output document, even if one or more authors have been defined with the \author command. However, author names will still be available for indexing purposes because they are always included in the header section of the output document. |
| nocategories | Prevents generation of the Categories section, even if tool categories have been specified with the \categories command. However, categories will still be available for indexing purposes because they are always included in the header section of the output document.. |
| nokeywords | Prevents generation of the Keywords section, even if a list of keywords has been specified with the \keywords command. However, keywords will still be available for indexing purposes because they are always included in the header section of the output document.. |
| notoc | Prevents generation of the Contents section. By default, a table of contents is always generated with links to all sections and subsections defined in the document, unless this parameter is specified. |
| nocopyright | Prevents generation of copyright information, even if some copyright information has been defined with the \copyright command. If this parameter is not specified, copyright information is always generated by default. |
7.55 \method[<method-parameters>]opt <formal-description> <description>
Defines a method subsection. This command can only be used for object documents. <formal-description> is a plain text formal description (in metalanguage) of a method of the object being documented, and <description> is a description of the method's parameters, functionality, usage, etc. The compiler automatically creates a Methods section if one or more methods are defined.
The \method command recognizes the following parameters:
| label:<label-id> | Defines a label for local references to this section. <label-id> can be used with the \lref command to create local links. This parameter is necessary because a label cannot be defined in the formal description of an object's property or method. If the label could only be defined in the method's description body, all local references would point to a wrong location in the target document. |
Example:
         \method { void NetworkTransfer.setConnectionTimeout( int seconds ) } {
            Sets the connection timeout time in seconds for this \c NetworkTransfer objects.
            The default timeout (if this method is not called) is six seconds.
         }
See also the \staticmethod command.
7.56 \methods <methods-body>
Defines the Methods section of the document. This command can only be used for generic documents. It is appropriate mostly for research papers and similar academic documents.
7.57 \module <module-id>
This command is mandatory in a tool document, but it cannot be used in other document classes. <module-id> is the plain text identifier of the module to which the tool being documented pertains.
7.58 \n
Inserts a line break. Breaks the current line and continues the rest of the paragraph from a new line. Note that inserting two successive line breaks with \n\n is not the same thing as, and should not be used in place of, starting a new paragraph by inserting a blank line.
7.59 \nf
Inserts a line break and clears all floating elements. Floating elements are those that use the float block parameter. Where normal text paragraphs are wrapping around floating items, the \nf command is useful to stop wrapping and continue the text in a new line below all floating elements.
7.60 \nop
This is the no operation command. It performs no action and does not change the generated document in any way.
7.61 \note <note-body>
Forces a new paragraph, if necessary, and generates a note. Note paragraphs are rendered with a specific text color and style (green and italics in the default PIDoc style sheet).
7.62 \nowrap <unwrapped-text>
Disables text wrapping for the <unwrapped-text> element. See also the \wrap command.
7.63 \object <object-id>
This command is mandatory in an object document, but it cannot be used in other document classes. <object-id> is the plain text unique identifier of the object being documented. For generic documents, the \document command is mandatory and must be used to identify the document. Similarly, the \tool and \script commands are reserved for tool and script documents, respectively.
7.64 \parameter <parameter-name> <parameter-description>
Defines a parameter subsection. This command can only be used for tool and script documents. <parameter-name> is the name or identifier of a tool or script parameter, and <parameter-description> is a description of the parameter's functionality, purpose, usage, valid rage, etc. The compiler automatically creates a Parameters section if one or more parameters are defined.
7.65 \pragma[<pragma-parameters>]opt
This command modifies the behavior of the PIDoc compiler by overriding its working parameters. The \pragma command recognizes the following parameters:
| basedir:<base-directory>opt | Set the target reference documentation system. If specified, <base-directory> must be the root directory of an existing PixInsight reference documentation system, where the current document will be generated and integrated. If no directory is specified, the target system will be the documentation system pertaining to the running PixInsight installation. |
| base_dir:<base-directory>opt | A synonym for basedir. |
| generate | Generate an output document. |
| nogenerate | Do not generate an output document. Useful for syntax verification and diagnostics purposes. |
| no_generate | A synonym for nogenerate. |
| html5 | Generate output in HTML 5 format. |
| xhtml | Generate output in XHTML 1.0 strict format. |
| equations | Render LaTeX equations. |
| noequations | Do not render LaTeX equations. Useful to save time when all equations have been generated in a previous compilation, and the current changes have been made exclusively to text contents. |
| no_equations | A synonym for noequations. |
| highlightcode | Perform syntax highlighting for \code blocks. |
| highlight_code | A synonym for highlightcode. |
| nohighlightcode | Do not highlight syntax in \code blocks. |
| no_highlight_code | A synonym for nohighlightcode. |
| numbersections | Number all sections and subsections automatically (this is the default setting for generic, tool and script documents). |
| number_sections | A synonym for numbersections. |
| nonumbersections | Do not generate section and subsection numbers. |
| no_number_sections | A synonym for nonumbersections. |
| numberequations | Generate equation numbers automatically by default. |
| number_equations | A synonym for numberequations. |
| nonumberequations | Do not generate equation numbers by default. |
| no_number_equations | A synonym for nonumberequations. |
| numberfigures | Generate figure numbers automatically by default. |
| number_figures | A synonym for numberfigures. |
| nonumberfigures | Do not generate figure numbers by default. |
| no_number_figures | A synonym for nonumberfigures. |
| numbertables | Generate table numbers automatically by default. |
| number_tables | A synonym for numbertables. |
| nonumbertables | Do not generate table numbers by default. |
| no_number_tables | A synonym for nonumbertables. |
| backup | Backup existing files in the target documentation system. |
| nobackup | Do not generate backups; always replace existing files in the target documentation system. |
| no_backup | A synonym for nobackup. |
| errorwarnings | Treat compiler warnings as errors. |
| error_warnings | A synonym for errorwarnings. |
| noerrorwarnings | Do not treat compiler warnings as errors. |
| no_error_warnings | A synonym for noerrorwarnings. |
The \pragma command does not generate any document output. It can be used multiple times and at any location in a PIDoc compilation unit. Each \pragma command modifies compiler parameters from the point it appears in the source code.
7.66 \predefined[<method-parameters>]opt <formal-description> <description>
Defines a predefined symbol (or macro) subsection. This command can only be used for object documents. <formal-description> is a plain text formal description (in metalanguage) of a predefined symbol related to the object being documented, and <description> is a description of the symbol's functionality, usage, etc. The compiler automatically creates a Predefined Contants section if one or more predefined symbols are defined.
The \predefined command recognizes the same parameters as the \method command.
Example:
         \predefined { #define MouseButton_Left 0x01 } {
            Represents the primary mouse button (usually the left button).
         }
7.67 \property[<property-parameters>]opt <formal-description> <description>
Defines a property subsection. This command can only be used for object documents. <formal-description> is a plain text formal description (in metalanguage) of a property of the object being documented, and <description> is a description of the property's functionality, valid values, usage, etc. The compiler automatically creates a Properties section if one or more properties are defined.
The \property command recognizes the following parameters:
| label:<label-id> | Defines a label for local references to this section. <label-id> can be used with the \lref command to create local links. This parameter is necessary because a label cannot be defined in the formal description of an object's property or method. If the label could only be defined in the property's description body, all local references would point to a wrong location in the target document. |
| readonly | Specifies that this property allows read-only access, that is, its value cannot be modified. The compiler generates a "read-only" tag for read-only properties. |
| read_only | A synomym for readonly. |
| readwrite | Specifies that this property allows read-write access, that is, its value can be freele acquired and modified (this is the default state). |
| read_write | A synomym for readwrite. |
Example:
         \property[readonly] { uint ByteArray.length } {
            The length in bytes of this \c ByteArray object.
         }
See also the \staticproperty command.
7.68 \ref <reference-id>
Inserts a reference. <reference-id> is a plain text identifier that should be defined with the \reference command. References are represented as superscript text between brackets, linked automatically to the corresponding items in the References section.
7.69 \reference <reference-id> <reference-body>
Defines a reference. <reference-id> is a plain text identifier that can be used with the \ref command to create a local link to the reference.
7.78 \required <formal-description>
Defines a required #include header or imported module for the object being documented. This command can only be used for object documents. <formal-description> is a plain text formal representation of the #include directive. The compiler automatically generates a paragraph with each required header near the top of the document.
Example:
\required { #include <pjsr/StarDetector.jsh> }
7.79 \results <results-body>
Defines the Results section of the document. This command can only be used in generic documents. It is appropriate mostly for research papers and similar academic documents.
7.80 \right <text>
Forces a new paragraph, if necessary, and sets the text alignment property of <text> to right. This command generates the text-align:right CSS property within the style attribute of the specified <text> item.
7.81 \s <strong-text>
Tags the <strong-text> element with the strong emphasis attribute. Strong text is rendered with a specific font style and typeface, usually bold.
See also the \e command.
7.82 \script <script-id>
This command is mandatory in a script document, but it cannot be used in other document classes. <script-id> is the plain text unique identifier of the script being documented. For generic documents, the \document command is mandatory and must be used to the same purpose. Similarly, the \tool and \object commands are reserved for tool and object documents, respectively.
7.83 \section <section-title> <section-body>
Defines a custom top-level section of the document. This command is optional for all document classes, and should be used only when none of the predefined sections (Introduction, Description, etc.) fits the requirements of a particular document. This happens more frequently in generic documents.
Sections and subsections are automatically numbered (unless this feature is explicitly disabled in the compiler; see the \pragma command) and listed in the Contents section of the document with local links.
Top-level sections cannot be nested. Defining a section inside a section is illegal and generates a compilation error. To define subsections, use the \subsection and \division commands (which are synonyms).
If you want to define a label to generate local references to a section, use the \label command at the beginning of the <section-title> block. For example:
         \section { \label this_is_a_section_label The Section Title } {
            ...
         }
7.84 \sref <script-id> <link-text>
Creates a link to a script document within the target reference documentation system. <script-id> is the plain text unique identifier of a script document (see the \script command), and <link-text> is a word or block that will be linked to the specified document. If you use this command, you should also include the linked script in a list of related scripts; see the \relatedscripts command.
7.85 \staticmethod[<method-parameters>]opt <formal-description> <description>
Defines a static method subsection. This command can only be used for object documents. <formal-description> is a plain text formal description (in metalanguage) of a static method of the object being documented, and <description> is a description of the method's parameters, functionality, usage, etc. The compiler automatically creates a Static Methods section if one or more static methods are defined.
The \staticmethod command recognizes the same parameters as the \method command.
Example:
         \staticmethod { Boolean File.exists( String filePath ) } {
            Returns true if the specified \a filePath corresponds to an existing file.
         }
See also the \method command.
7.86 \staticproperty[<property-parameters>]opt <formal-description> <description>
Defines a static property subsection. This command can only be used for object documents. <formal-description> is a plain text formal description (in metalanguage) of a static property of the object being documented, and <description> is a description of the property's functionality, valid values, usage, etc. The compiler automatically creates a Static Properties section if one or more static properties are defined.
The \staticproperty command recognizes the same parameters as the \property command.
Example:
         \staticproperty[readonly] { String File.systemTempDirectory } {
            The absolute path of the system's local temporary directory. On most operating
            systems this is normally the value of the TEMP environment variable.
         }
See also the \property command.
7.87 \sub <subscript-text>
Tags the <subscript-text> element as subscript. Subscript text is represented with a smaller font size and slightly below the baseline of the normal paragraph text.
See also the \sup command.
7.88 \subsection <subsection-title> <subsection-body>
Defines a custom subsection of the document. This command is optional for all document classes, and can only be used within the body of a top-level section, either a predefined section, or a custom section specified with the \section command. Nested subsections—that is, subsections inside subsections—are allowed without specific limits.
The same remarks made for the \section command regarding labels and references are also valid for \subsection.
The \division command is a synonym for \subsection that you can use for better differentiation of nested subsections, if you prefer.
7.89 \sup <superscript-text>
Tags the <superscript-text> element as superscript. Superscript text is represented with a smaller font size and above the upper line of the normal paragraph text.
See also the \sub command.
7.90 \table[<table-parameters>]opt <table-body>
Generates a table with optional caption and header rows. The <table-body> argument must be a block, and includes the table rows along with the table caption and headers, depending on the specified parameters:
| header:<header-rows>opt | Enables generation of one or more header table rows. The optional <header-rows> parameter value is the number of header rows to generate. By default a single header row is generated. When this parameter is specified, the first <header-rows> rows (or the first row if no value is specified) are used as header rows. |
| caption | Enables generation of a table caption row. When this parameter is specified, the first element in the <table-body> block defines the caption text. |
| numbered:<table-id>opt | Defines a numbered table. Table numbers are assigned automatically by the PIDoc compiler. The table number is rendered as "Table n" above the table caption. If the optional <table-id> is specified, it can be used to create symbolic references with the \tblref and \tblnum commands. |
| unnumbered | Disables automatic numbering for this table. No table numbers are assigned or generated for unnumbered tables. |
| <block-parameters> | The \table command accepts the whole set of block parameters. |
Example:
         \table[caption,header,uunumbered] {
            { The Table Caption }
            { {Column One} {Column Two} {Column Three} }
            { { First row, column 1 } { First row, column 2 } { First row, column 3 } }
            { { Second row, column 1 } { Second row, column 2 } { Second row, column 3 } }
            { { Third row, column 1 } { Third row, column 2 } { Third row, column 3 } }
         }
Column One |
Column Two |
Column Three |
|---|---|---|
First row, column 1 |
First row, column 2 |
First row, column 3 |
Second row, column 1 |
Second row, column 2 |
Second row, column 3 |
Third row, column 1 |
Third row, column 2 |
Third row, column 3 |
7.91 \tblnum <table-id>
Creates a table number through a symbolic reference. <table-id> is a plain text identifier of a table defined in the document (see the \table command and its numbered parameter). This command is similar to \tblref, but it only generates the table number without a link to the table.
The compiler replaces symbolic table references by actual table numbers automatically. To understand how symbolic references work, see the \eqnnum command.
7.92 \tblref <table-id>
Creates a symbolic reference to a table. <table-id> is a plain text identifier of a table defined in the document (see the \table command and its numbered parameter). Unlike \tblnum, this command generates the table number and a link to the table in the document.
The compiler replaces symbolic table references by actual table numbers automatically. To understand how symbolic references work, see the \eqnref command.
7.93 \tbltag
This command can only be used within the caption block of a \table command. \tbltag creates a text fragment with an automatically generated table number, suitable to be included in a table caption. For this command to work, the table being defined must be numbered, either implicitly or explicitly with a numbered parameter.
This command generates a text fragment of the form:
Table <n> —
where <n> is the number of the current table. See the \figtag command for an example.
7.94 \title <title-text>
Specifies the document's title. This command is mandatory for generic documents, but it cannot be used for tool, script and object documents.
7.95 \tool <tool-id>
This command is mandatory in a tool document, but it cannot be used in other document classes. <tool-id> is the plain text unique identifier of the tool being documented. For generic documents, the \document command is mandatory and must be used to the same purpose. Similarly, the \script and \object commands are reserved for script and object documents, respectively.
7.96 \tref <tool-id> <link-text>
Creates a link to a tool document within the target reference documentation system. <tool-id> is the plain text unique identifier of a tool document (usually the identifier of an existing tool), and <link-text> is a word or block that will be linked to the specified tool document. If you use this command, you should also include the linked tool in a list of related tools; see the \relatedtools command.
7.97 \u <underlined-text>
Underlines the <underlined-text> element.
7.98 \usage <usage-body>
Defines the Usage section of the document. This command is optional for tool and script documents, but it cannot be used for generic and object documents.
7.99 \v <var-id>
Tags the <var-id> element as a variable identifier. Variables are rendered with a specific font style, usually italics.
7.100 \verbatim[<verbatim-parameters>]opt <preformatted-text>|<file-path>
Forces a new paragraph, if necessary, and includes either <preformatted-text> or the contents of a plain text file at <file-path>, without collapsing whitespace characters. This means that existing white spaces will be preserved at the left side of each text line. With the default style sheets, verbatim text is rendered using a monospaced font.
The \verbatim command accepts the following parameters:
For fragments of text with backslashes, square brackets and other special characters, verbatim blocks can be used to avoid having to escape them. For example:
         \box {
            \verbatim { #:
               This is some text with backslashes \ \ and brackets [ ] { } inside a box.
            :# }
         }
This is some text with backslashes \ \ and brackets [ ] { } inside a box.
7.101 \vs[<vs-parameters>]opt
Breaks the current paragraph and inserts a vertical space before the next paragraph. The \vs command generates a <div> element with a style="margin-top:<n>;" attribute in the output XHTML document, where <n> represents the spacing length in CSS syntax. By default <n> is 1em (a space equivalent to the width of an 'm' character in the current font), but the spacing length can be controlled with the following parameter:
See also the \hs command.
7.102 \w
Inserts a normal white space character. A normal white space can be collapsed with other adjacent whitespace characters into a single white space, or used as a word boundary to break a text line. See also the \wh command.
7.103 \wh
Inserts a hard white space character. Hard white spaces cannot be collapsed and cannot be used to wrap lines. They are equivalent to HTML character entities. See also the \w command.
7.104 \wm
Inserts an em space character. An em space has the same width as an em character in the current font, and is collapsible as a normal whitespace character. See also the \wn and \wt commands.
7.105 \wn
Inserts an en space character. An en space has the same width as an en character in the current font, and is collapsible as a normal whitespace character. See also the \wm and \wt commands.
7.106 \wrap <wrapped-text>
Enables normal text wrapping for the <wrapped-text> element. Normal text wrapping occurs at word boundaries. See also the \nowrap command.
7.107 \wt
Inserts an thin space character. A thin space has a very small width. It can be used to fine tune separation between characters or words, and is collapsible as a normal whitespace character. See also the \wm and \wn commands.
7.108 \xref <resource-uri> <link-text>
Creates a link to an external resource. <resource-uri> is an URI specification to the resource (usually an URL to a document, web page, file, etc.) and <link-text> is a word or block that will be linked to the specified resource.
7.109 \z
Inserts a zero-width space character. The zero-width space is a non-printable character that can be used as a potential line break at any location in a word or paragraph. It is encoded as the ​ HTML entity.
7.110 Special Character Commands
PIDoc provides a number of commands to generate some frequently used typographical signs and special characters:
In addition to these commands, the en dash (–) and em dash (—) characters can be inserted as two and three consecutive hyphens: -- and --- respectively.
There are also specific commands to generate Greek letters, and you can also include the whole set of HTML 5 character entities in your PIDoc source code.
7.111 Greek Letter Commands
The letters of the Greek alphabet, including lowercase, uppercase and a few variants, can be specified with dedicated PIDoc commands that we enumerate in the table below.
7.112 Block Parameters
A number of commands share a set of parameters collectively known as block parameters. We describe them in the following table.
Note— When specifying dimensions as percentages (relevant to the size, width and height block parameters), remember that percent signs must be escaped (\%) to prevent their interpretation as comment specifiers.
8 PIDoc Examples
[hide]
The following documents, pertaining to the PixInsight Reference Documentation, are good examples of tool documents:
- The ScreenTransferFunction tool and its PIDoc source code.
- The CurvesTransformation tool and its PIDoc source code.
- The BackgroundNeutralization tool and its PIDoc source code.
A more advanced example:
Finally, also a good example is the PIDoc source code of this document, which you can download below. Take into account that this is a rather technical document describing a programming language, so you'll find lots of \c commands and escaped characters, necessary to describe the PIDoc syntax.
Copyright © 2010-2022 Pleiades Astrophoto. All Rights Reserved.